SPOILER WARNING!
This article contains information that may ruin your enjoyment of discovering the game's secrets for yourself. Read at your own risk! |
Read at your own risk!
| Who Killed DeMarco? | |
|---|---|
| |
| Details | |
| Type | Mystery |
| Duration | May 17th - September 15th, 2022 |
"Who Killed DeMarco?" is the first Mystery in Sea of Thieves. It began on May 17th, 2022 and ended on September 15th, 2022, leaving its conclusion open for players to experience and earn rewards.
Using clues found online and in-game, players could investigate the murder of DeMarco Singh.
| |
|---|
Latest page revision: October 03, 2022 04:54 UTC
The story so far
The skeletal remains of DeMarco Singh have been discovered on Sea Dog's Rest. Found on the remains are the clothing and belongings of DeMarco, including his necklace, trousers, gloves, boots, belt, satchel, a bottle, and his hat. His jacket is missing.
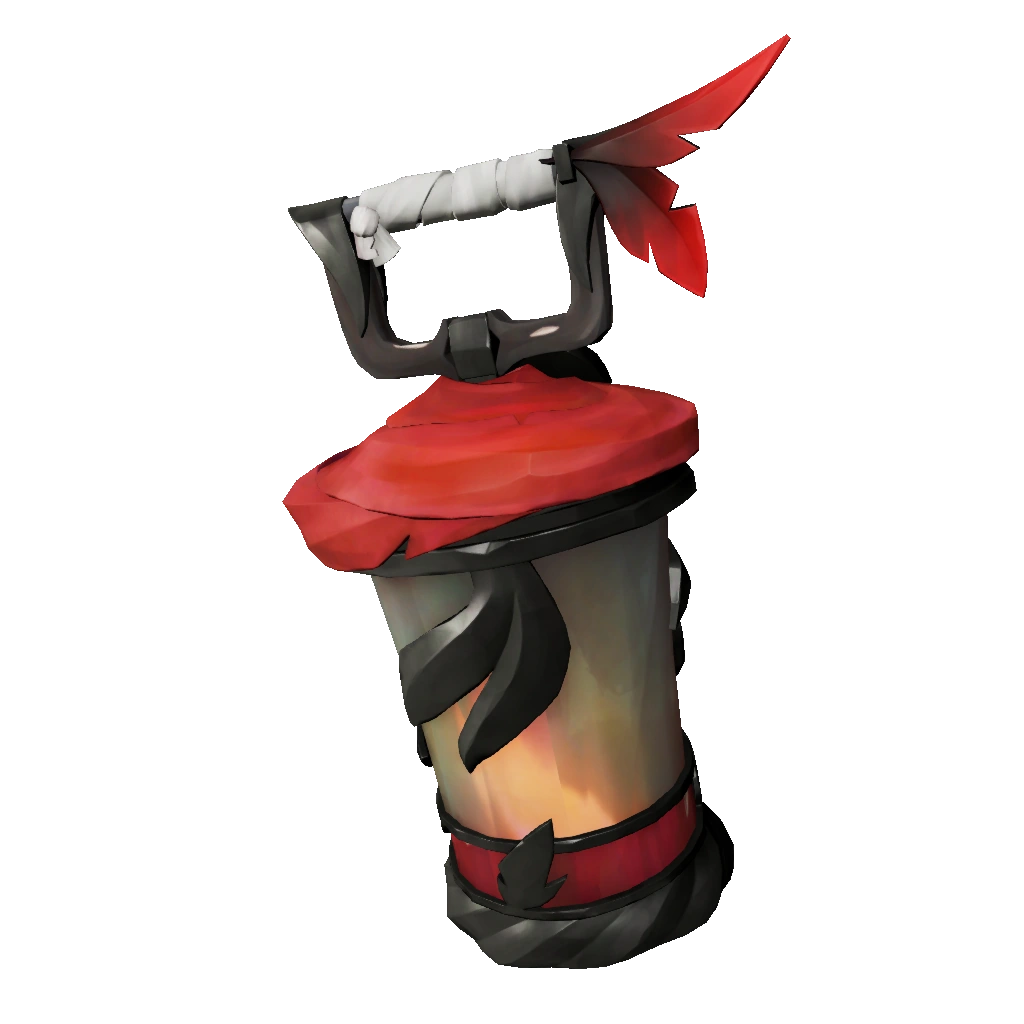
Near to the remains is a music box and several footprints leading to a note. The note reads, "From shell of red into water deep, the truth shall come to light...", a riddle that leads to an Old Sailor's Chest submerged out from the south-east shore. In the chest is the Fallen Sea Dog Lantern with mystical powers that can be used to reveal clues relating to the murder of DeMarco.
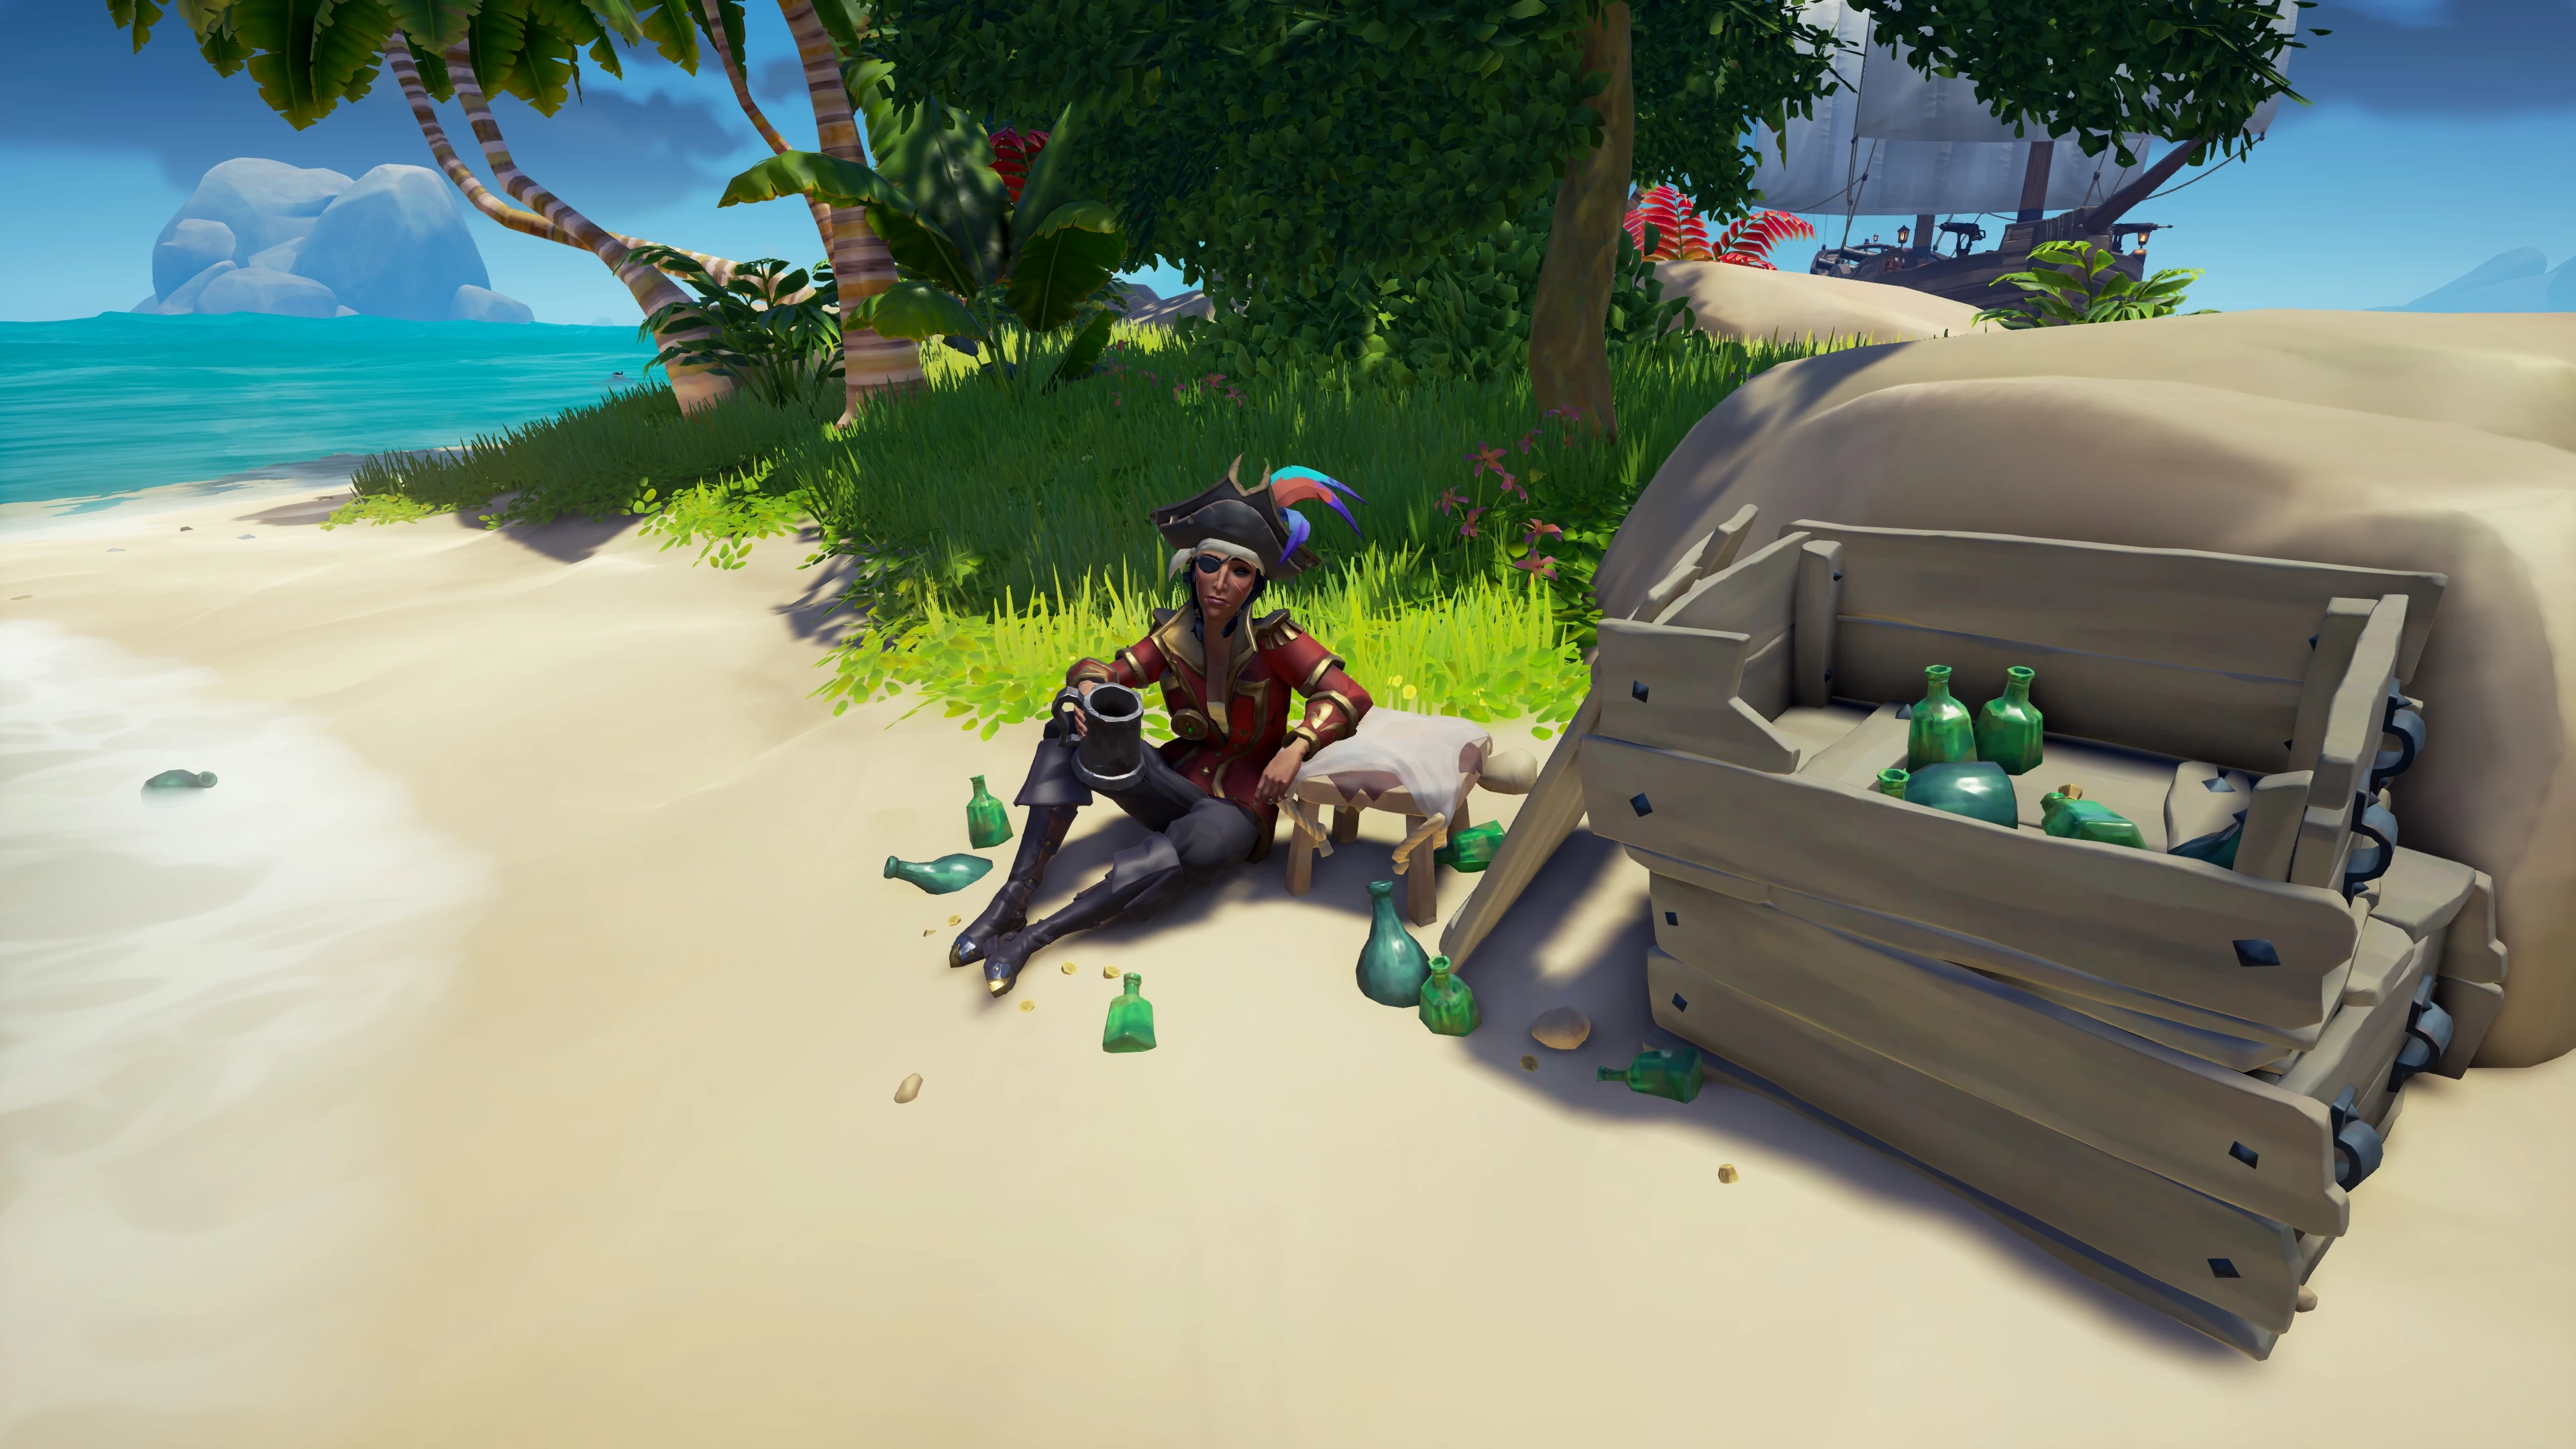
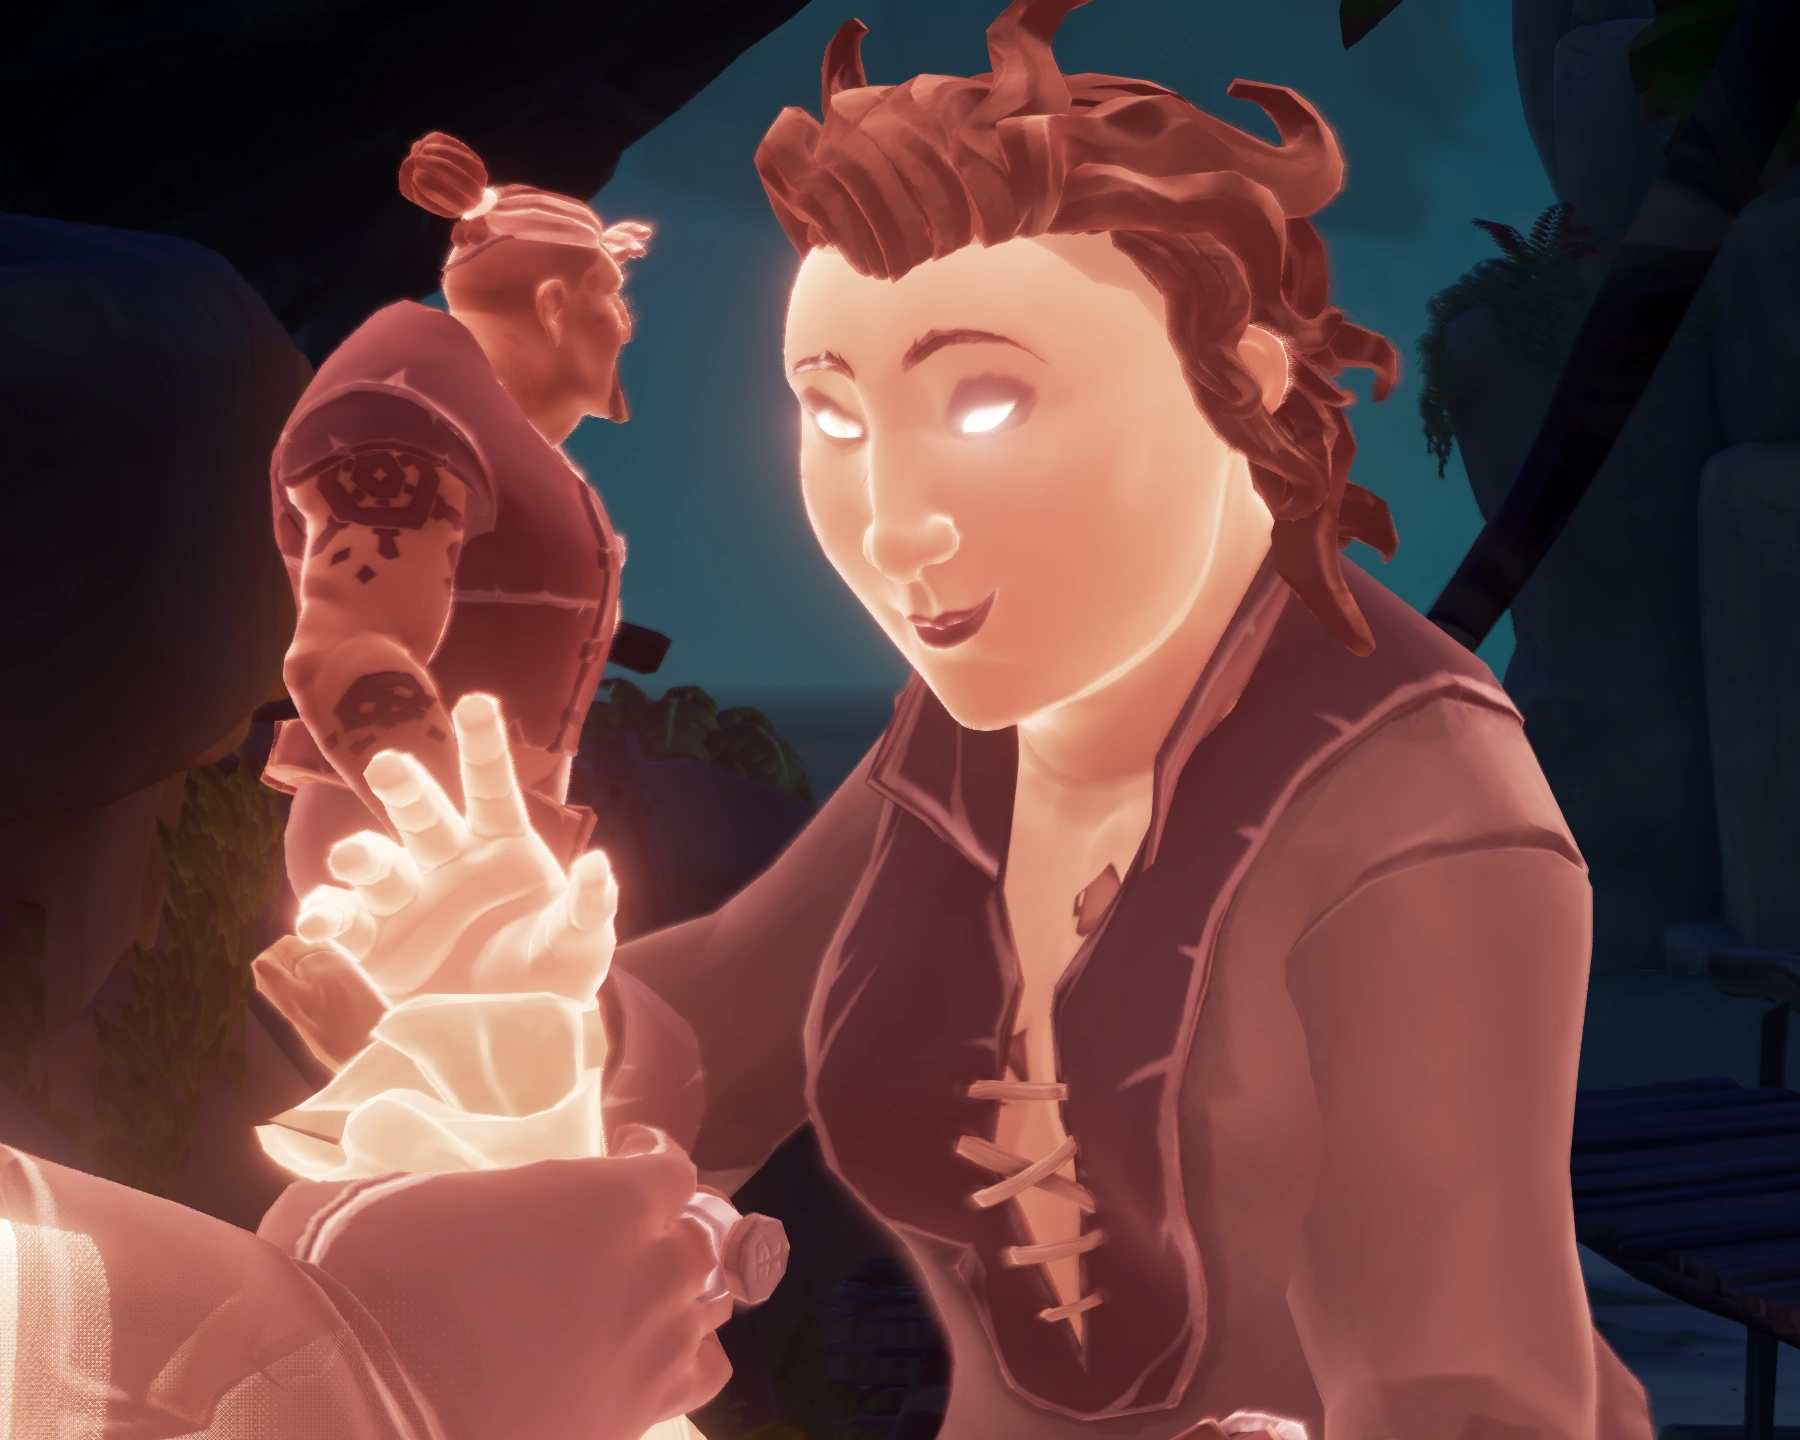
Not long after the remains were discovered, Lesedi Singh, DeMarco's sister, visited the island. She could be found seated haphazardly on the beach near the remains, drinking from a tankard. She would mumble to herself sorrowfully and had no interest in conversing with other visitors. A short time later she moved on from the island to an unknown destination.
Investigating pirates have since uncovered DeMarco's Ship Log and have found that prior to his demise, DeMarco had embarked on a secretive and seemingly dangerous mission leading into the Devil's Shroud. In the logbook, it's noted that in order to cover his tracks, DeMarco employed a crew unfamiliar to him and set sail aboard an undistinguished Galleon. However despite these efforts, he found himself pursued by Lesedi and possibly others. He chose to encode his chart for safe-keeping, but unfortunately the key has been burnt up and spread across the sea. Fragments of the key are now being discovered by pirates and very slowly the chart is being decoded. With part of the log decoded, investigating pirates have discovered the sunken shipwreck of The Howling Wolf deep below the waves at coordinates J-7. The Fallen Sea Dog Lantern reveals three journals of DeMarco's crew in the shipwreck, which led to another ghostly vision of the Pirate Lord meeting with three other pirates at Thieves' Haven.
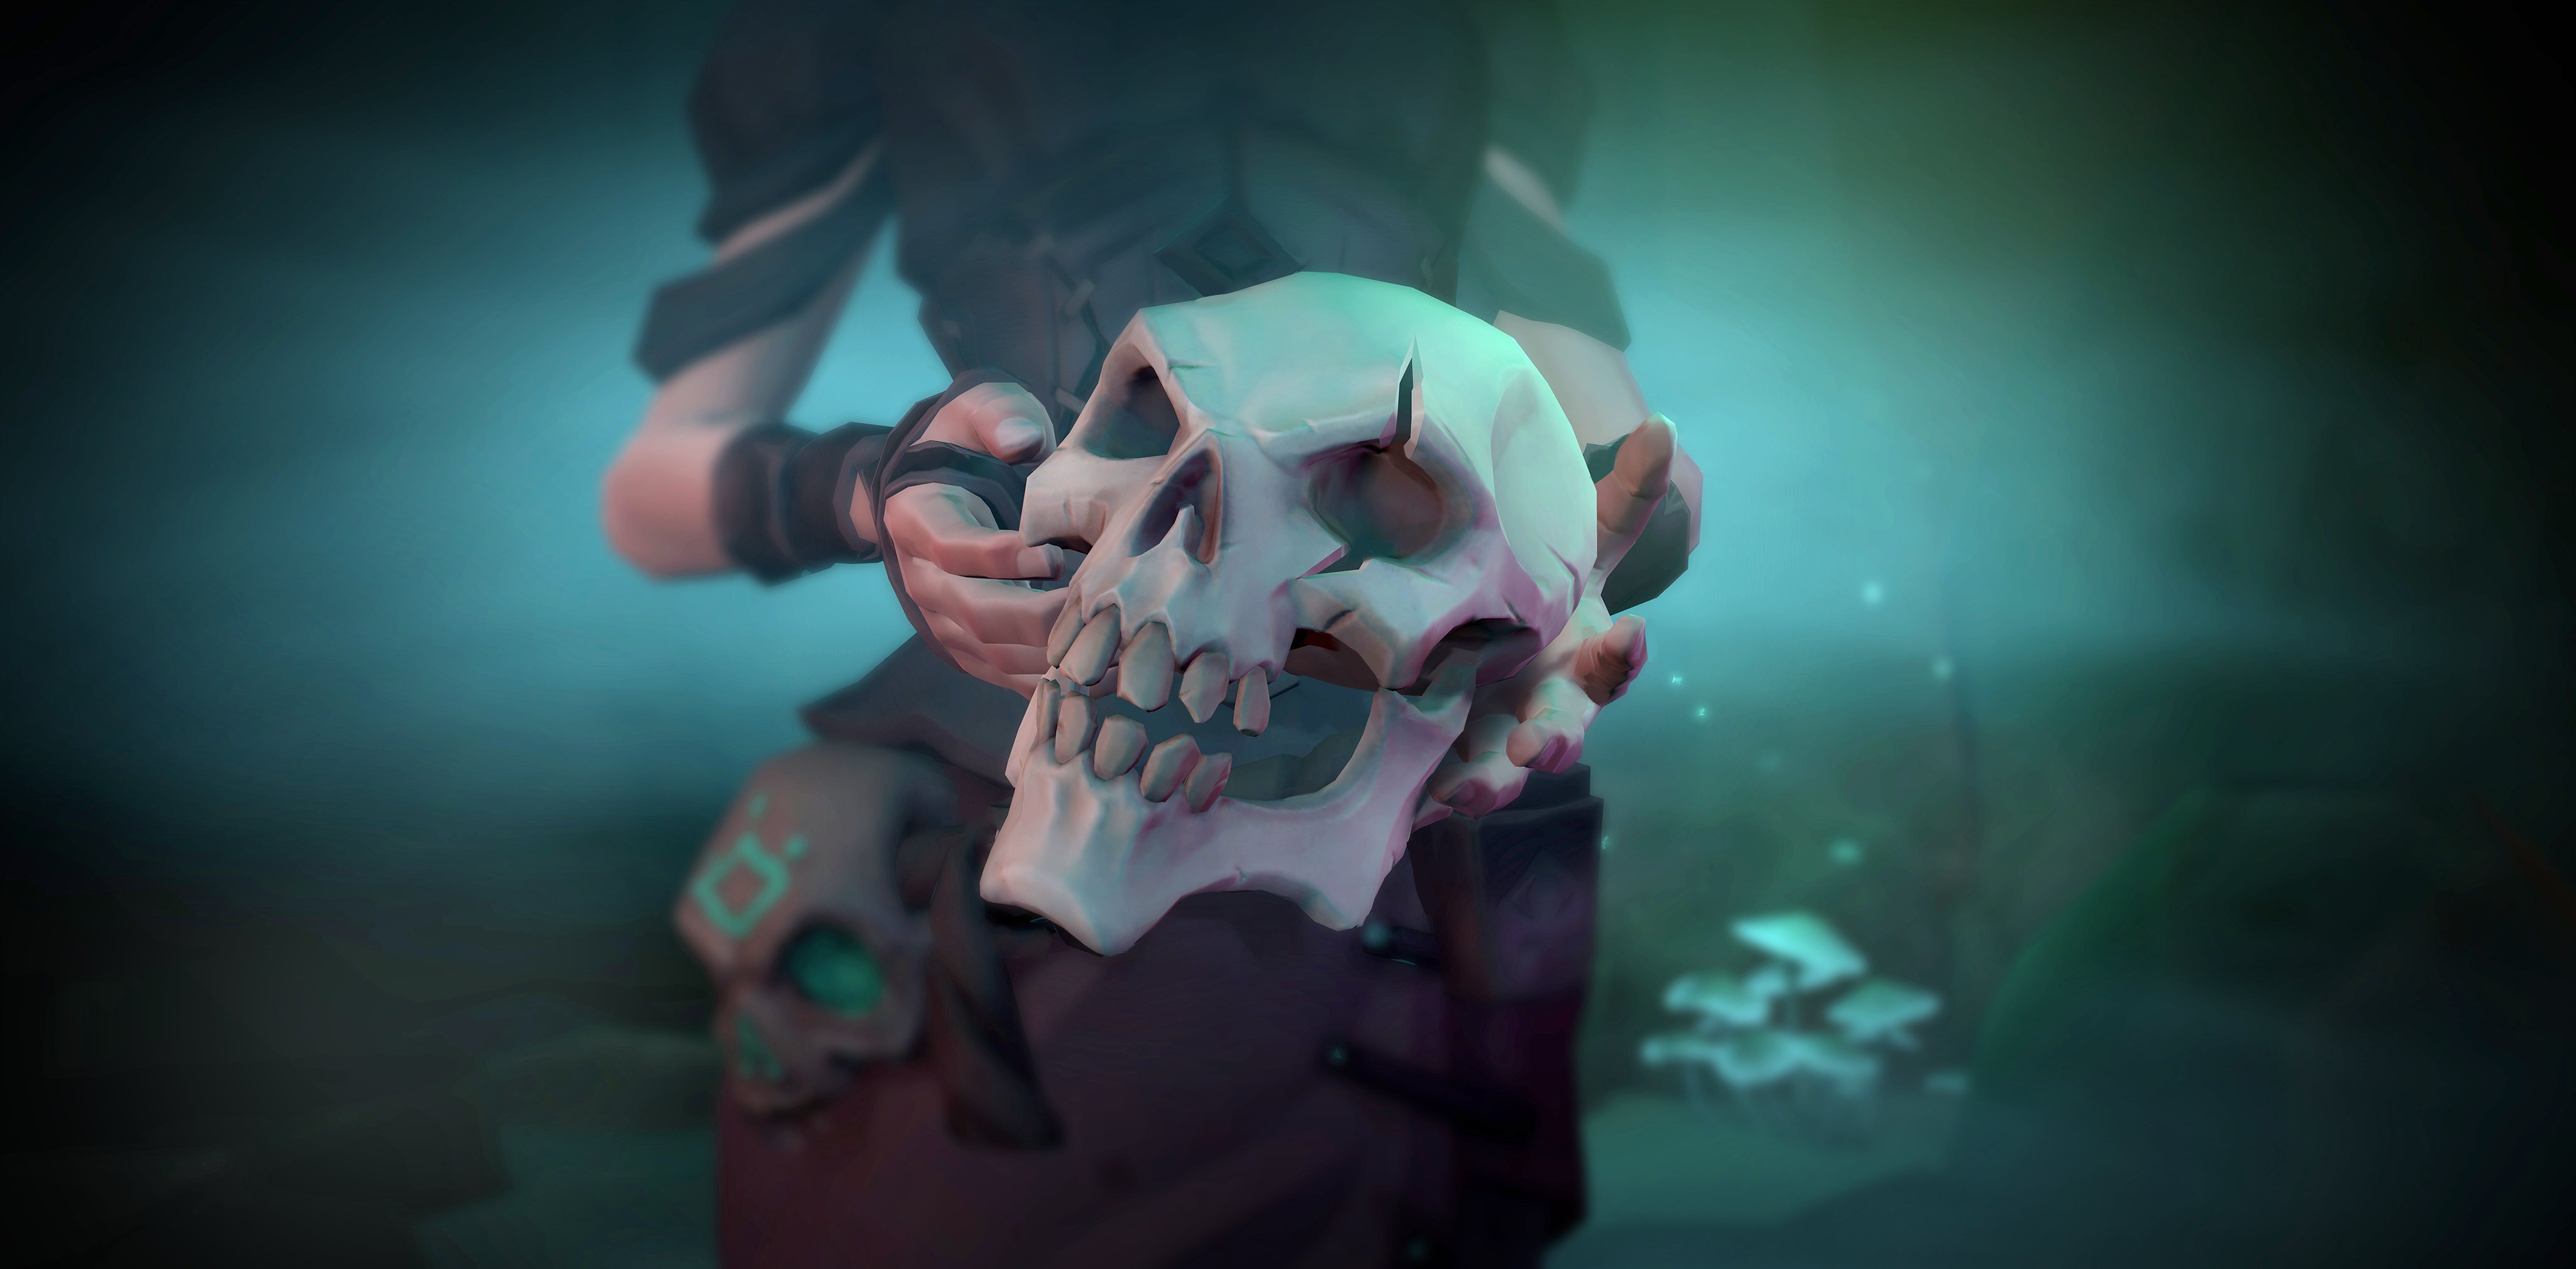
A note hidden in the Pirate Lord's quarters implies the Pirate Lord's involvement in the disappearances of the mutinous crew. It suggests that they are being restricted from reaching and using the Ferry of the Damned to return to the Sea of Thieves. From this note, the skull of Sally Marshall was found and through a meeting with the Order of Souls, one of the Madames was able to extract memories from Sally's skull. Her memories lead to the skull of Harry Handles. A second meeting with the Order of Souls was made to extract Harry's memories which lead to William Davies' skull at The Sunken Grove. There was no hidden text found at the island, but rather a broken music box and silver skull coin discovered on the ground near the skull. One of Wanda's Journals now has a new line scrawled on it's pages saying: "He is trapped. Find him...".
A third meeting with an Order of Souls using the skull from The Sunken Grove revealed not another vision, but a voice telling pirates that all the visions revealed with the lantern were lies fabricated by an unnamed female. The voice asks for help, and instructs the listeners to follow the coins and to seek her spyglass.
VIEW FINALE (SPOILERS)
|
|---|
Puzzles in the Shrine of the Coral Tomb leads players to the Siren Queen who explains how she has been deceiving pirates into believing the Pirate Lord killed his own son, DeMarco. Using his powers, the Pirate Lord appears and crushes the Siren Queen under a rock fall, as Lesedi is freed from a Cursed Mermaid Statue.
In a conversation with Lesedi, the Pirate Lord explains how he previously came here to seek peace with the Sirens, and how he asked DeMarco to be his envoy in connecting with the Sirens. He goes on to explain how DeMarco thought he was a fool for trying to make peace with the Sirens. Their disagreement ended in DeMarco planning to start a new life outside the Sea of Thieves. When the Pirate Lord let this slip, the Siren Queen took the opportunity to frame the him for the murder of his own son. She used her powerful magic to create deceptions, in the hopes of weakening the Pirate Lord's reputation and following.
The scene ends with Lesedi speaking of how she believes her brother's soul may still be out there somewhere, and will continue searching until she can be sure.
Cosmetic items
The following cosmetic items are earned during this Mystery, and serve to help players find more clues:
Notable characters
This list is a collection of notable characters pertaining to the mystery such as recent interactions and possible grievances with DeMarco.
Suspects:
- Mysterious female perpetrator (Identity is revealed in Mystery's conclusion):
- Lesedi's message suggests an unidentified female has fabricated the many of the clues discovered so far, particularly those found using the Fallen Sea Dog Lantern discrediting the Pirate Lord.
- The Pirate Lord (Falsely accused by lantern clues):
- Several clues revealed using the Fallen Sea Dog Lantern suggest his involvement. However these have been proven to be false.
- The crew of the The Howling Wolf (Falsely accused by lantern clues):
- Several clues revealed using the Fallen Sea Dog Lantern suggest their involvement. However these have been proven to be false.
- Amaranta
- Claims to have no involvement and is currently preoccupied with Dark Brethren business.
For full details & information on characters see the list below:
| Full list of characters & details | ||
|---|---|---|
| Name | Location | Information |
| DeMarco Singh (Murder victim) (Sea Dogs co-founder) |
Remains on Sea Dog's Rest |
|
| Lesedi Singh (Sister & Sea Dogs co-founder) |
Unknown, last seen at Sea Dog's Rest |
|
| Ramsey Singh (Father & Pirate Lord) |
Athena's Fortune Hideout |
|
| Amaranta (Former Sea Dogs vice-leader) |
Last seen in the Sea of the Damned |
|
| Crew of The Howling Wolf |
Deceased
|
|
| Scarlett | Galleon's Grave Outpost |
|
| Tad | Morrow's Peak Outpost |
|
| Colin | Ancient Spire Outpost |
|
| Tracy | Sanctuary Outpost |
|
| Umbra | Lagoon of Whispers |
|
| Burnin' Tony |
| |
Notable clues
The major story clues are compiled and condensed here.
For a detailed timeline, see the Clue timeline section.
- A red shell on the south east beach points towards an Old Sailor's Chest underwater in the ocean.
- When interacted with, the chest permanently rewards the Fallen Sea Dog Lantern to keep.
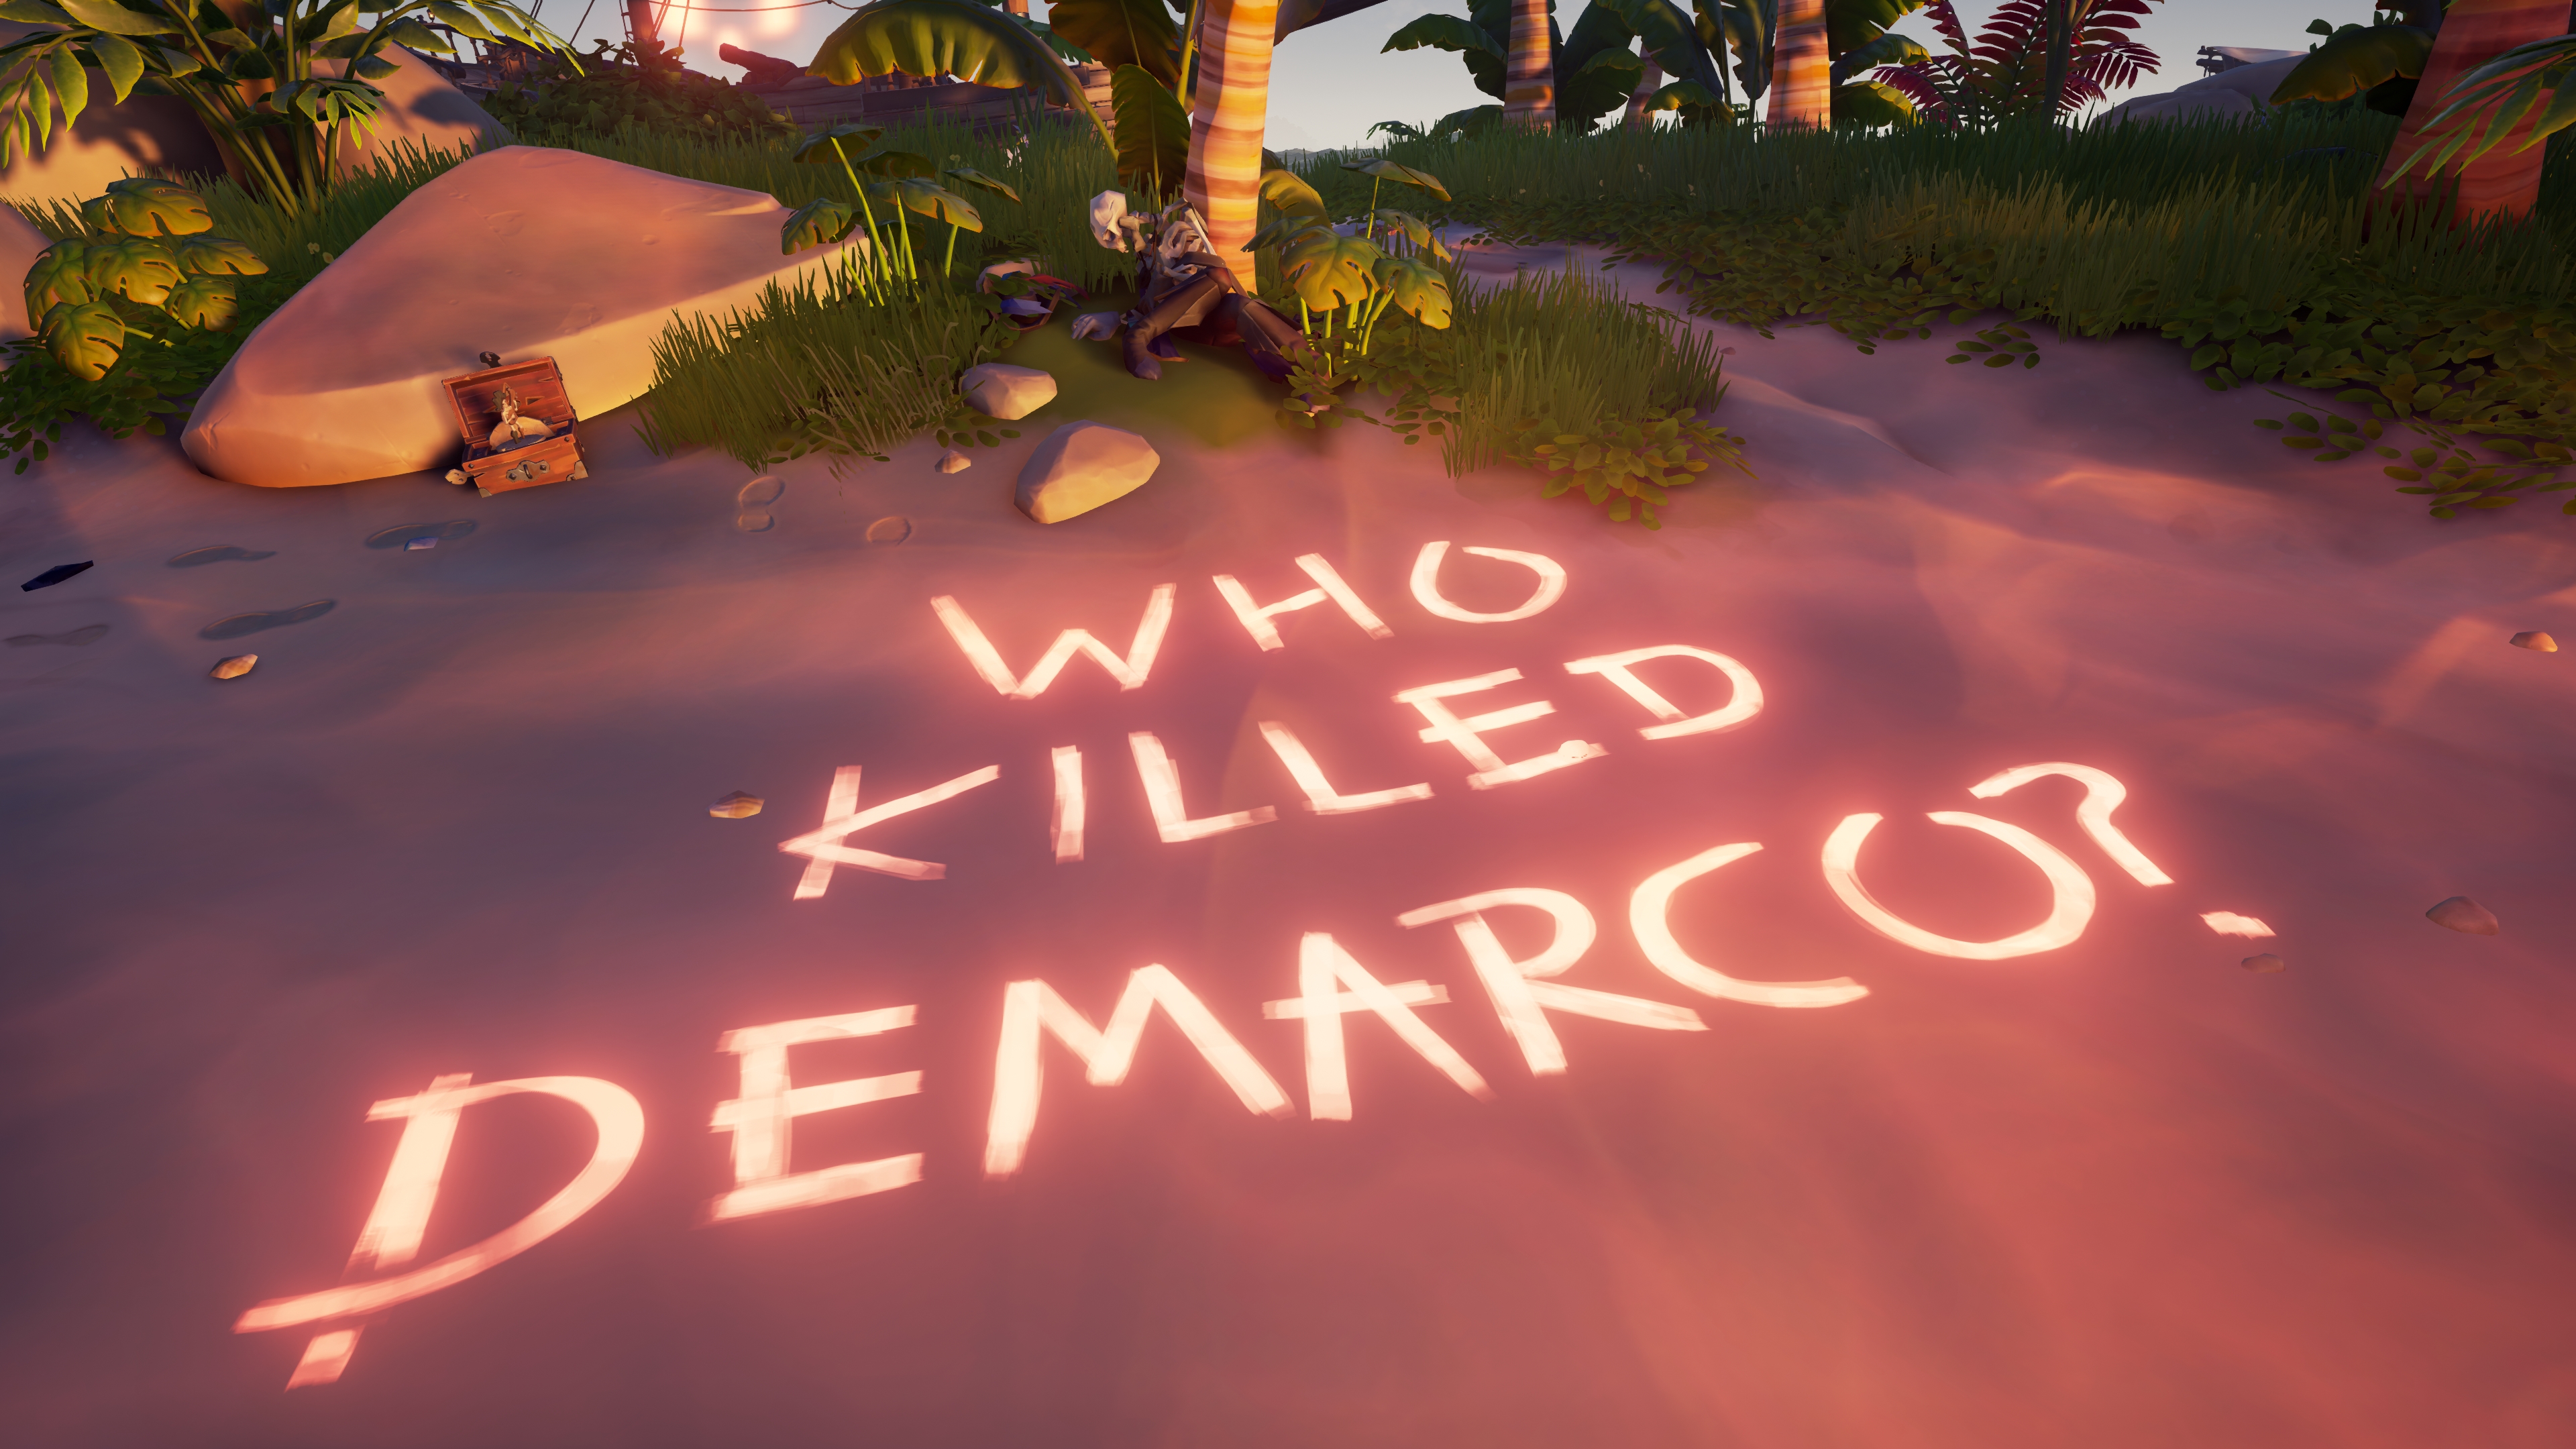
- The Fallen Sea Dog Lantern was used to reveal hidden text written on the north beach near the skeleton. The writing reads,
Gallery:

A red shell on the south east beach of Sea Dog's Rest, pointing towards the Old Sailor's Chest under the water.

The Old Sailor's Chest under the water at Sea Dog's Rest.

The Old Sailor's Chest under the water at Sea Dog's Rest.

Text reading "WHO KILLED DEMARCO?" on the north beach, revealed by using the Fallen Sea Dog Lantern.


- Grave notes:
- You're the last person I expected here. (Lone Cove)
- You thought I'd just let this go. (Wanderer's Refuge)
- You said yourself we were done. (Crooked Masts)
- So? I lied. (Kraken's Fall)
- Just listen! None of this feels right... (Ruby's Fall)
- Don't tell me you're becoming sentimental after all this time. (Sunken Grove)
- This isn't a joke! (Thieves' Haven)
- Of course it is. Right from the start, it has been. (Shark Bait Cove)
- He made that perfectly clear. (Flintlock Peninsula)
- Rowboat notes:
- The truth will come out. It always does, sooner or later. (Ashen Reaches)
- No-one can know I was here. (The Devil's Thirst)
- As if you could. (Mermaid's Hideaway)
- I've never seen you this upset... (Old Faithful Isle)
- You're being ridiculous. (Plunder Valley)
- Don't startle me like that! I nearly shot you. (Smugglers' Bay)
- How could it not be? They're coming for me. I can feel it. (Sunken Grove)
- I don't think so. I have to cover my tracks. (Thieves' Haven)
- I mean it. I don't trust anyone, not any more. (Crescent Isle)
- Siren Shrine and Siren Treasury notes:
- Hardly. That'd make me a coward, and a liar. (Shrine of the Coral Tomb)
- You're an idiot. I know exactly what you two talked about. (Shrine of Ancient Tears)
- He didn't want you involved. You know that. You're too impulsive. (Shrine of Flooded Embrace)
- You! Determined as ever to follow in my footsteps, I see. (Shrine of Hungering)
- Heh... I think this is the first truly brave thing I've ever done. (Shrine of Ocean's Fortune)
- Me? I'm not the one throwing their life away. (Shrine of Tribute)
- So? It's my life we are talking about. (Treasury of Sunken Shores)
- Like it or not, this is goodbye. (Treasury of the Lost Ancients)
- I don't think so. I found you once, I can hunt you down again. (Treasury of the Secret Wilds)
- Smugglers' Bay:
- DeMarco and Tracy by the high south bridge in the afternoon (15:00).
- Tracy is holding a note with a Speaking Trumpet symbol, along with "LI" and "VII", translating into roman numerals for "51" and "7". This relates to a code hidden in the Official Podcast Episode #8, of which the logo is a Speaking Trumpet, at timestamp 51:07.
- Led to by Tanya mentioning "on top of a bridge that high", and Teri mentioning "Trassshhyyy went missshhing" and "afternoon".
- Marauder's Arch:
- DeMarco and Scarlett by the Skeleton Throne at sunset (20:30).
- Scarlett is holding a compass which is pointing to the north, and DeMarco is pointing to the west.
- Led to by Tony mentioning "chair of bone", and Tess mentioning "sunset rendezvous".
Gallery:
DeMarco and Tad at The Devil's Thirst.
DeMarco and Tracy at Smugglers' Bay.
Closeup of Tracy's parchment note (LI VII).
DeMarco and Umbra at Discovery Ridge.
The sheet music Umbra is holding at Discovery Ridge.
DeMarco and Colin at Crook's Hollow.
DeMarco and Scarlett at Marauder's Arch.
View of DeMarco pointing and Scarlett's compass.


- Visions revealed using the Fallen Sea Dog Lantern display a scene showing Ramsey paying the crew of The Howling Wolf to mutiny against DeMarco.
- Using the Fallen Sea Dog Lantern in the Pirate Lord's captain's quarters at the Athena's Fortune reveals the word "GUILTY" repeatedly written all over the wall.
- A note found hidden in the Pirate Lord's captain's quarters suggests that he is responsible for ensuring that the mutinous crew of The Howling Wolf do not reach the Ferry of the Damned.
Read the note found at Athena's Fortune
The three are gone, but not all by my hand - the storm in the west took the last of them, just as day was breaking.
My influence keeps them from the Ferry. Even if their remains are found, they will be anonymous. And only truths can reveal truths...
There will be no proof I was involved. Without it, no-one will dare challenge me.-
-
-
-
Gallery:
"GUILTY" seen written surrounding the Pirate Lord.
The Pirate Lord meeting with the mutineers.
Close up of the Pirate Lord paying one of the mutineers.
"GUILTY" poster.


The logbook details preparations for a journey into the Shroud for unknown purposes. The daily entries include the meetings as seen in the visions revealed by the Fallen Sea Dog Lantern.
The logbook reads as follows:
Read DeMarco's Ship Log
Page 1
Day 1: Preparing to depart, but the Midnight Prowler is too well-known. Will need a shipwright!
Day 3: Messages sent to those who can (and will still) help me in secret. Time to find a Rowboat...
Day 4: Met Scarlett atop Marauder's Arch. A Galleon will be waiting for me. Now for supplies
Day 6. Tad was not happy meeting at Devil's Thirst, but at last I have supplies for the crossing.
Day 7: I've decided I have another stop to make. The Sea of Thieves should remember me fondly!
Day 9: My debt to Colin has been settled. Now I can leave Wanderers Refuge with a clear conscience.-
-
-
-
Page 2
Day 10: Made arrangements to have this log collected. If I fail, it will be the only record of my death.
Day 11: So long, Smuggler's Bay. Thanks to Tracy, my ship will soon have a crew to help me sail.
Day 12: Met my crew. As requested, all are strangers to me. They seem in high spirits.
Day 13: Sailing for Discovery Ridge. Calm waters so far. This is starting to feel very real...
Day 14: A small scuffle among the crew. A split lip and some sour looks, but nothing to worry about.
Day 15: As promised, the Scribe, Umbra, furnished me with a path through the Shroud.-
-
-
-
Page 3
Day 16: Sails on the horizon - familiar ones. Is someone pursuing us? I fear it may be so...
Day 17: Those same sails! There can be no doubt. Someone is hunting me, and gaining ground.
Day 18: The crew seem anxious. I hear them whispering. And the sails are coming closer.
Day 20: On course to Burnin' Tony. He will hide the log until my contact comes for it.
Day 21: No choice now. I've encoded the chart with our planned route. Still need to hide the key...
Day 22: It's her. It has to be. But did someone send her? Sister, what have you done...?-
-
-
-
Page 4
(Strange... It looks like this page has been ripped out of the log. Who might have done this?)
Journal on shelf above bed in captain's quarters
Not sure how much more I can stand. Trying to pretend like we're going to sail merrily into the mist with Captain Swagger, knowing what's going to happen to him?
At least I can see why the boss wanted to meet us on such a massive island. That's smart thinking. Nice and devious, like pirates should be.
We'll be devious, too. Wait until the 'Captain' lets his guard down, and then - no more swagger...-
-
-
-
Journal between barrels on middle deck
'We'll have your coin ready', they said. 'Come to the old painting', they said! They forgot to mention how many of the blummin' things there are!
If we don't find the right spot soon I'm going to eat this book, I'm that famished. Breaking the pirate code is one thing, but I didn't agree to miss dinner.
Maybe I'll cheer up once we've been paid. Nothing lifts your spirits like gold in your pocket - and a blade up your sleeve...-
-
-
-
Journal behind the bed in the brig
Mutiny is such a strong word. I mean, if we never really meant to help send DeMarco on his way, was he really our Captain to begin with?
Besides, I lost more than my fair share of silver in that Arena of his. You can't pit pirates against one another and not expect to reap what you sow...
But before all that, we've got to get paid by whoever's organised our little deception. The Witching Hour can't come soon enough.-
-
-
-
Piles of silver coins were then discovered, with each pile forming the shape of a letter. All letters combined spelled the word, "PRISONER".
Lesedi's Spyglass could also be found in a prisoner's cage at Crooked Masts. The scope of the spyglass sports a design that can be used as a means to uncover further clues.
Gallery:
Lesedi's Spyglass in hand.
Lesedi's Spyglass in use.
Clue timeline
This section records the detailed timeline of hints and clue progression as they've been revealed by varying methods such as social media posts and in-game progression.
Icon legend: ![]() = Web
= Web ![]() = In-game
= In-game ![]() = Involves use of Fallen Sea Dog Lantern
= Involves use of Fallen Sea Dog Lantern ![]() = Involves use of Sea Dogs Cipher (Tool available here)
= Involves use of Sea Dogs Cipher (Tool available here)
Source: Sea of Thieves Season Six: Official Content Update Video at 2:17
Details: During the "Sea of Thieves Season Six: Official Content Update Video", DeMarco can be seen sitting with a Crate of Devil's Rum Bottles. "Red rum" backwards spells out the word "murder".
Music box clues
Source: Sea of Thieves official YouTube channel
Details: Sea of Thieves shared a video across their social media titled simply with a skull emoji (💀). The video shows a music box on Sea Dog's Rest playing We Shall Sail Together. The music switches to a rusty, minor tone as the camera pans to the skeletal remains of what is presumed to be DeMarco. One frame at the end shows the text "WHO?" over a colour-inverted view of the same scene.
Gallery:
The body and music box.
Text reading "WHO" at the end of the video.


Details: A human's skeletal remains by a unplayable music box are found in-game on Sea Dog's Rest directly after the YouTube video showing the scene is uploaded. A note attached to the skeleton reads "It's just remains... What could have happened here?". The remains are presumed to belong to DeMarco as his hat, satchel and pendant are present.
Source: Sea of Thieves Twitter
Details: Sea of Thieves tweeted "Are we seeing things?" along with an image of the music box and skeletal remains on Sea Dog's Rest. The music box in this image is shown to have two arrows circling each other carved onto its left-hand side. The letters "MM" are engraved too, relating to the roman numerals for 2000. This post was a call for 2000 retweets on the tweet, the circling arrows bearing a resemblance to the Twitter retweet icon, at which point a number of occurrences began happening in-game.
Gallery:
The image shared on Twitter.
The circling arrows and "MM" in the image.


Details: A sorrowful Lesedi appears on the north west beach. When spoken to she says "I can't... not right now... Just leave me alone...".
Gallery:
Lesedi sitting at Sea Dog's Rest.
Details: Footprints have appeared leading away from the music box to a some nearby rocks. Among the rocks is a note that reads:
- A red shell on the south east beach points towards an Old Sailor's Chest underwater in the ocean.
- When interacted with, the chest permanently rewards the Fallen Sea Dog Lantern to keep.
- The Fallen Sea Dog Lantern can be used to reveal hidden text written on the north beach near the skeleton. The writing reads,
Gallery:
A red shell on the south east beach of Sea Dog's Rest, pointing towards the Old Sailor's Chest under the water.
The Old Sailor's Chest under the water at Sea Dog's Rest.
The Old Sailor's Chest under the water at Sea Dog's Rest.
The Fallen Sea Dog Lantern obtained from the Old Sailor's Chest under the water at Sea Dog's Rest.
Text reading "WHO KILLED DEMARCO?" on the north beach, revealed by using the Fallen Sea Dog Lantern.
Details: When the tweet captioned "Are we seeing things?" reached 2000 retweets, a number of occurrences began to happen in-game immediately.
- The music box on Sea Dog's Rest begins to play Seek the Dead on repeat.
This shanty is leas to the discovery of hidden notes attached to graves found on various islands across the Sea of Thieves. These notes are only visible using the Fallen Sea Dog Lantern.
- You're the last person I expected here. (Lone Cove)
- You thought I'd just let this go. (Wanderer's Refuge)
- You said yourself we were done. (Crooked Masts)
- So? I lied. (Kraken's Fall)
- Just listen! None of this feels right... (Ruby's Fall)
- Don't tell me you're becoming sentimental after all this time. (Sunken Grove)
- This isn't a joke! (Thieves' Haven)
- Of course it is. Right from the start, it has been. (Shark Bait Cove)
- He made that perfectly clear. (Flintlock Peninsula)
Source: Sea of Thieves Twitter
Details: Sea of Thieves tweeted "Are we hearing things?" along with a video of the music box on Sea Dog's Rest playing Seek the Dead.
- The music box has letters "MMM" engraved on the front next to a symbol resembling wind blowing a cloud from right to left (east to west).
- The previous circling arrows and "MM" are on the left-hand side.
Gallery:
The music box updated with the MMM carving.
Close-up of the MM and MMM carvings.


Source: Sea of Thieves Twitter
Details: Sea of Thieves tweeted "We know we're hallucinating but imagine if this could actually happen though." with an accompanying image featuring a view looking out toward the main dock at Sanctuary Outpost with seven Skull Clouds in the sky.
- 7 Skull Clouds (a mix between regular Skeleton Forts, Forts of Fortune, and Fort of the Damned).
- 3 Dock flags (front to back:
- Figure 8 knot (normal knot as seen in-game)
- Overhand knot (edited knot)
- "Cloud/Wind" symbol from earlier "MMM Music Box" clue but rotated "blowing" upward (south to north).
- A nearby rowboat with text ("BOAT") hidden on its front.
Gallery:
The image as it appeared on Twitter.
Close-up of flag symbols along the dock.
Close-up of "Boat" text on rowboat.


Details: Icons of keys were found hidden in different pages across the official Sea of Thieves website. When clicked, each icon lead to a separate page with an image of that key. Each key featured a different symbol and word engraved on it.
- What's New leads to spin key
- Adventure and Exploration leads to turn key
- The Pirate Lord leads to wind key
- Community Hub leads to pivot key
- Pirate Code leads to roll key
Gallery:
The key icon that lead to individual key pages.
The key with "SPIN" written on it.
The key with "TURN" written on it.
The key with "WIND" written on it.
The key with "PIVOT" written on it.
The key with "ROLL" written on it.


Details: Once 3000 people had visited the wind key page on the Sea of Thieves website, a number of occurrences began happening in-game immediately.
- The music box on Sea Dog's Rest begins to play Row Row Row Your Boat on repeat.
- The Fallen Sea Dog Lantern can be used to reveal notes attached to certain wrecked rowboat models on islands all over the Sea of Thieves.
- The truth will come out. It always does, sooner or later. (Ashen Reaches)
- No-one can know I was here. (The Devil's Thirst)
- As if you could. (Mermaid's Hideaway)
- I've never seen you this upset... (Old Faithful Isle)
- You're being ridiculous. (Plunder Valley)
- Don't startle me like that! I nearly shot you. (Smugglers' Bay)
- How could it not be? They're coming for me. I can feel it. (Sunken Grove)
- I don't think so. I have to cover my tracks. (Thieves' Haven)
- I mean it. I don't trust anyone, not any more. (Crescent Isle)
Source: Sea of Thieves Twitter
Details: Sea of Thieves shared an image across official social channels of an off-screen pirate holding the Fallen Sea Dog Lantern on Sea Dog's Rest. The letter "C" can be seen on the top edge of the lantern.
Gallery:
The image of the lantern shared across official social channels.
The letter "C" hidden on the lantern.


Source: Sea of Thieves Twitter
Details: Sea of Thieves shared a night scene image of the music box on Sea Dog's Rest with newly added heart, arrow and IV with a line above, in addition to the previous symbols.
- In roman numerals, I̅V̅ represents "4,000".
- The arrow symbol was previously seen on a key labelled with "TURN" which was hidden on the official Sea of Thieves website.
Gallery:
The image shared on social media.
The new symbols.
The "TURN" key with the same arrow symbol.


Details: A number of occurrences began happening in-game.
- The music box on Sea Dog's Rest begins to play Ballad of the Mer on repeat.
- The Fallen Sea Dog Lantern can be used to reveal notes in each Siren Shrine and Siren Treasury across the Sea of Thieves.
- Hardly. That'd make me a coward, and a liar. (Shrine of the Coral Tomb)
- You're an idiot. I know exactly what you two talked about. (Shrine of Ancient Tears)
- He didn't want you involved. You know that. You're too impulsive. (Shrine of Flooded Embrace)
- You! Determined as ever to follow in my footsteps, I see. (Shrine of Hungering)
- Heh... I think this is the first truly brave thing I've ever done. (Shrine of Ocean's Fortune)
- Me? I'm not the one throwing their life away. (Shrine of Tribute)
- So? It's my life we are talking about. (Treasury of Sunken Shores)
- Like it or not, this is goodbye. (Treasury of the Lost Ancients)
- I don't think so. I found you once, I can hunt you down again. (Treasury of the Secret Wilds)
Who is T coded clues
Source: Sea of Thieves Twitter
Details: Sea of Thieves shared an image with an accompanying caption of "Where did this come from? #WhoIsT?".
The image is of a note with a conversation between DeMarco and Lesedi:
DeMarco: I don't have time for this, Lesedi. We're finished here.
Lesedi: NO. We are NOT finished, DeMarco. Get back here! DeMarco!
I can't let him do this... whatever it takes. I have to... Huh? What was the sound? There's a skelly hiding here! Get out of the way, T-
On a scrap of paper behind is written "Who is T?".
Gallery:
The image of the note shared across official social channels.

Details: Hinted at by, and immediately after, the "#WhoIsT?" post, Tavern and Equipment Shop NPCs, who all have names beginning with "T", are found to have unique dialogue lines when spoken to while holding the Fallen Sea Dog Lantern. Additionally, Lesedi is missing from Sea Dog's Rest.
Tina
What's all this about then? Are you saying it's not bright enough in here?
Hmm... Maybe you're right! I've been working so hard on rebuilding I might have missed a candle here or there.
I swore I'd throw a party once this place was open again, but right now all I really want is a snooze!-
-
-
-
Tom
Oh, that lantern of yours looks rather weathered. Are you after a replacement?
Well then, let Tom show you his neeeeew PREMIUM SELECTION!
Is what I'd like to say, but I've been so busy rebuilding, this is still my claaasssic ASSORTMENT! Sorry.-
-
-
-
Tracy
Hey there, pirate. You can call me Tracy, just let me know whenever you want anything.
...For example, you might want to put that lantern away and pull out a tankard instead. It's better for holding your grog!
Mind you, one of my tavernkeeper ancestors used to serve what he called a 'Hot Groggy' warmed over the coals of the hearth. Is that what you're ordering?-
-
-
-
Tyler
Hello there! You look like you've got something important on your mind.
The only person I've seen looking as pensive as you was that clean-shaven lad I glimpsed the other day.
I'm not sure what had them so perplexed - but I suppose Criminal Cave can be a dangerous place.-
-
-
-
Tasha
You know, I'm not one to gossip, but you've just reminded me of a visitor we had in here the other night!
The Pirate Lord's son ordering a drink in my very own tavern! If I weren't so tight-lipped, I'd be shouting about it from the rooftops.
He seemed very anxious, though, and kept checking his pocket watch. Said he had to be away before the clock struck twelve... Anyway, keep that to yourself!-
-
-
-
Tim
Sigh...
Sorry, I'm not really in the mood to talk. I just feel so... confined stuck here day in, day out.
Not like that DeMarco chap. I saw him ambling off to Discovery Ridge without a care in the world. It's alright for some...-
-
-
-
Tanya
Yeah? It's a lantern, what about it?
Lots of people acting strangely these days.
Look at Tracy. Meeting a stranger on top of a bridge that high? It was weird.-
-
-
-
Travis
That's a fine lantern you've swiped, but what about a new spyglass to go with it?
I've got a great model that's so powerful I was able to spy some lass skulking by a cave painting, even though the sun was barely up!
And it also-- hang on, no, I sold that one yesterday. Oh well. Sorry to get your hopes up!-
-
-
-
Teri
Mind me eyessshh! I'm a little the worssshhh for wear today.
Leeasssshhttt it's q-q-quieter than the other day when Trassshhyyy went missshhing.
I HAD TO C-C-COVER her whole ssshhhiffft. My whole af... afternoon waaaassshteed. Gruuggh...-
-
-
-
Tony
I could have used a lantern like that on the day I saw that strange lady sneaking around.
Why did she wander all alone, seated on a chair of bone?
It's quite perplexing. And everyone knows I HATE riddles!-
-
-
-
Tess
Here for one of my special grogs? I thought so! They're all the rage lately.
I had someone make the trip here just for a tankard of 'Crimson Rotter' to calm their nerves.
They were very excited. Something about a sunset rendezvous... How romantic!-
-
-
-
Trevor
Enter, weary traveller, and take respite from the burdens of oceanic existence.
Why, I declare your aspect even more bedraggled than the poor soul I encountered while venturing afield upon my midday constitutional!
They tarried between roaring flame and thundering water. A gamut of elemental sensations! Truth be told, it was somewhat vexations, so I bade them farewell. Ah, kismet...-
-
-
-
Tallulah
Hello, stranger! I must say, I'm seeing a lot of new faces here these days.
The other day I had an out-of-towner arrive who seemed... well, completely lost, if I'm honest.
He was looking rather scorched and kept muttering about campfires. Nearly drank me dry!-
-
-
-
Tad
Oh dear, my friend. As lanterns go, that's not a particularly ostentatious example, is it!
I'm sure I can find something a little more deluxe for you to go showing off around the Outposts.
Is it a gilded handle you're after? Or perhaps some gemstone studding. Please, do browse my wares and let me know!-
-
-
-
Tristan
Is it lantern insurance you're after? My policies are very popular at the moment.
Just the other day I provided full coverage to one of my counterparts who was taking a trip into the Roar.
It was a little pricey, but better safe than sorry if you're heading to The Devil's Thirst. And besides, I've got a wife and twelve kids to think about!-
-
-
-
Details: Clues in outpost NPC dialogue, revealed by holding the Fallen Sea Dog Lantern led to a number of times and locations. At each, ghostly visions of DeMarco meeting with certain outpost NPCs can be seen on these islands while holding the Fallen Sea Dog Lantern at specific in-game times. Each vision is visible for 1 in-game hour.
- The Devil's Thirst: DeMarco and Tad by a campfire at midnight.
- DeMarco is holding a pocket watch with the time 6:15 or 18:15 showing.
- Led to by Tracy mentioning "Hot Groggy", Tasha mentioning "night" and "clock struck twelve", Tallulah mentioning "campfires", and Tristan mentioning "The Devil's Thirst" and "twelve".
- Discovery Ridge: DeMarco and Umbra on the small, round islet at sunrise.
- Crook's Hollow: DeMarco and Colin by a campfire at the east cave entrance at noon.
- Smugglers' Bay: DeMarco and Tracy by the high south bridge in the afternoon (15:00).
- Tracy is holding a note with a Speaking Trumpet symbol, along with "LI" and "VII", translating into roman numerals for "51" and "7". This relates to a code hidden in the Official Podcast Episode #8, of which the logo is a Speaking Trumpet, at timestamp 51:07.
- Led to by Tanya mentioning "on top of a bridge that high", and Teri mentioning "Trassshhyyy went missshhing" and "afternoon".
- Marauder's Arch: DeMarco and Scarlett by the Skeleton Throne at sunset (20:30).
Gallery:
Ghosts of DeMarco and Tad at The Devil's Thirst.
Ghosts of DeMarco and Tracy at Smugglers' Bay.
Closeup of Tracy's parchment note (LI VII).
Ghosts of DeMarco and Umbra at Discovery Ridge.
The sheet music Umbra is holding at Discovery Ridge.
Ghosts of DeMarco and Colin at Crook's Hollow.
Ghosts of DeMarco and Scarlett at Marauder's Arch.
View of DeMarco pointing and Scarlett's compass.
Details: Music boxes can be found nearby to traders, such as seapost traders and island delivery NPCs. When interacted with, these music boxes will randomly select from the regular set of music box shanties.
Source: Sea of Thieves TikTok at 1:09
Details: Sea of Thieves posted a TikTok video recapping the events of the Mystery so far. At 1:09, a code can be seen running vertically up the left-hand side of the video.
- The code:
S4NOB59FBMN7I9B
Gallery:
The code hidden in the TikTok video.
A close-up of the hidden code.

Source: Sea of Thieves Twitter
Details: Sea of Thieves posted a tweet with an image of an Order of Souls tent captioned "What secrets would the Order of Souls find if they searched your memories?". Three separated codes hidden in this image make a code of 15 characters long.
- The code:
OYB4ARB6QR7394ARBOYB4on the left barrelQR7on the left pillar3946on the back skull flame table
The image shared on Twitter.
"ARBOY" and "B4" on the left barrel.
"QR7" on the left pillar.
"3946" on the back skull flame table.


Source: Sea of Thieves Official Podcast Episode #8 at 51:07 (YouTube)
Details: A code can be spotted hidden in the background of Sea of Thieves Official Podcast Episode #8 at the video timestamp of 51:07.
This correlates to a ghostly vision of DeMarco and Tracy, with the roman numerals seen on the parchment held by Tracy (LI VII = 51 07) indicating the timestamp, while the Speaking Trumpet symbol on the same parchment relates to the Speaking Trumpet logo used by the Sea of Thieves Official Podcast.
- The code:
75995H5UYR57FOHOD(see note)
Note: Any number 5 has a chance to be the letter S. This is due to both the video quality, and the similarity between the letter and number.
The frame with hidden code (4K quality).
The hidden code.


Source: Sea of Thieves Instagram
Details: Sea of Thieves shared an image on Instagram showing the Shipwright Shop on Plunder Outpost captioned "What's your current ship set of choice?". Four codes can be seen hidden in this image, making a code of 17 characters long. The same post was shared across other social channels as well, although the codes are only present on Instagram.
- The code:
7U6R58Q78RS9CR485 7U6Runder the stairs on the dock58Q78below the lantern on the buildingRS9Con a crate to the rightR485under the stairs on the dock
- The code:
Note: Due to the low image quality, these characters are simply estimates.
Gallery:
The image shared on Instagram.
The code under the stairs on the dock.
The code below the lantern on the building.
The code on a crate to the right.


Source: Sea of Thieves Discord
Details: An account named "Shady Figure#5917" posted a now pinned image to #game-media on the Sea of Thieves official Discord server, simply captioned with a single red question mark emoji (❓). The image shows three candles on a table in the tavern on Plunder Outpost, while a male pirate sits in the background. Three codes can be seen hidden in this image.
014M8on the right plateNVF01on the piller775on the table by the tankard
Gallery:
The image shared on Discord.
A code on the right plate.
A code on the pillar.
A code on the table by the tankard.
The profile picture for Shady Figure#5917.


Details: Sea of Thieves hid multiple images of disc fragments through various means. Gold pieces fit to the outside of the disc and were received as an email by select subscribers. Silver pieces fit to the inside of the disc and were found through various other means. When put together, these fragments form a complete cipher disc with the Sea Dogs crest in the centre, potentially to use on the other codes found.
- Outer gold fragments (emails)
- Inner silver fragments (elsewhere)
JTDSKXfrom Shady Figure Discord DMsYLRGXFfrom Sea of Thieves Instagram storyNQfrom Shady Figure Discord DMsMBUHfrom Shady Figure Discord DMsVOACWEPIfrom Sea of Thieves Instagram DMs
Eternal link: A cipher/decipher disc tool is available here (by Chenzo)
When the two complete discs are overlaid, each letter of a previously found code can be linked to a new letter, then shifted by a certain amount to create a meaningful string.
Each deciphered string is an account name for a particular social media platform. The located account's bio shows a short string of characters, while the profile picture shows a new, blank fragment for the inner disc.
| Outer | Z | A | C | 4 | H | A | F | G | D | I | U | 8 | B | M | N | 3 | 9 | Q | S | R | W | 5 | O | 7 | 6 | Y | Z |
|---|---|---|---|---|---|---|---|---|---|---|---|---|---|---|---|---|---|---|---|---|---|---|---|---|---|---|---|
| Inner | A | C | W | E | P | I | J | T | D | S | K | X | Y | L | R | G | X | F | N | Q | M | B | U | H | V | O | A |
- Instagram code - 7U6R58Q78RS9CR485 → SUKITHESHIPWRIGHT
- Instagram account - sukitheshipwright
- Account bio - aq57 → LETS
- Shift disc by 14 clockwise to achieve.
- YouTube code - 75995H5UYR57FOHOD → COMMODOREHOCKADAY
- YouTube account - Commodore Hockaday
- Account bio - Erouy → SHARE
- Shift disc by 22 clockwise to achieve.
- Has video a titled "🎶" of the music box on Sea Dog's Rest playing Ballad of the Mer.
- Twitter code - OYB4ARB6QR7394 → WINSTONPHOEBUS
- Twitter account - WinstonPhoebus
- Account bio - awg74 → TALES
- Shift disc by 20 clockwise to achieve.
- TikTok code - S4NOB59FBMN7I9B → SMILEYTHEPIRATE
- TikTik account - smiley_the_pirate
- Account bio - dz → OF
- Shift disc by 9 clockwise to achieve.
- Discord code - OI4M8NUROI775 → LAMPWICKLARRY
- Discord account - Lampwick Larry#5958
- Account bio - 6od75 → GLORY
- Shift disc by 9 clockwise to achieve.
- Has a message reading "Don't linger in the water".
When shifted by the right amount, each account description was decrypted to build the phrase "LETS SHARE TALES OF GLORY".
Gallery:
A gold disc segment reading "QS".
A gold disc segment reading "RW5O76".
A gold disc segment reading "YZA".
A gold disc segment reading "C4".
A gold disc segment reading "HEF".
A gold disc segment reading "GDIU8B".
A gold disc segment reading "MN39".
A silver disc segment reading "JTDSKX".
A silver disc segment reading "YLRGXF".
A silver disc segment reading "NQ".
A silver disc segment reading "MBUH".
A silver disc segment reading "VOACWEPI".
A second layer inner disc segment from WinstonPhoebus's profile picture.
A second layer inner disc segment from Commodore Hockaday's profile picture.
A second layer inner disc segment from smiley_the_pirate's profile picture.
A second layer inner disc segment from Lampwick Larry#5958's profile picture.
A second layer inner disc segment from sukitheshipwright's profile picture.


Source: Sea of Thieves Twitter
Details: Sea of Thieves posted an image on Twitter of the unused Great Sea Dog Chest, with the central crest removed. The post is captioned:
A code can be seen hidden on the right side of the chest.
- The code:
2FA
Gallery:
The image shared on Twitter.
The code hidden on the chest.


Source: Sea of Thieves Twitter
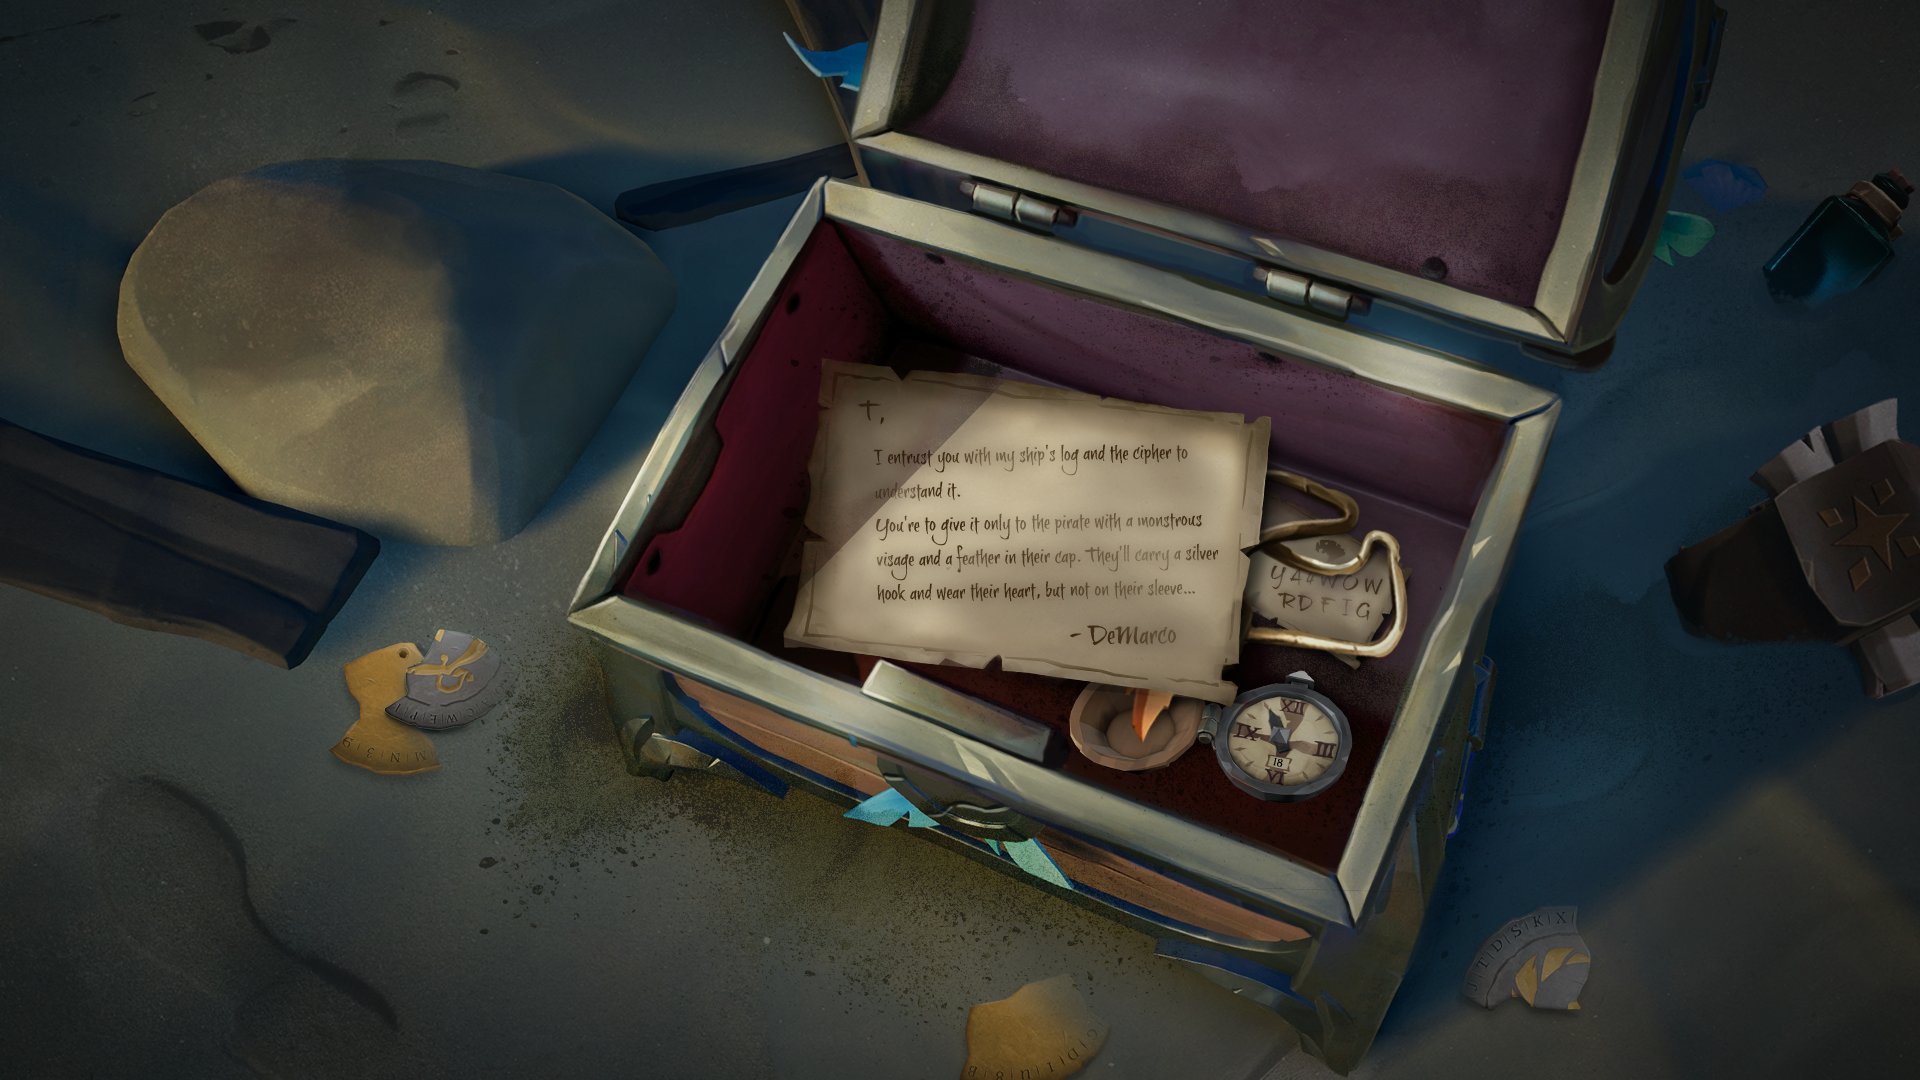
Details: After having solved codes using a deciphering disc, Sea of Thieves shared an image of the same Great Sea Dog Chest, although now unlocked and with the remains of the code discs scattered around as well as DeMarco's sachet. The post is captioned:
A number of items can be seen inside the unlocked chest.
- A note reading "
YA4WOW RDFIG". This was deciphered to "AWAITS GLORY" or "GLORY AWAITS". - A Pocket Watch showing the date as the 18th and a time of 10:55 with both watch hands overlapping pointing at the 11 position.
- A note written by DeMarco to "T".
T,
I entrust you with my ship's log and the cipher to understand it.
You're to give it only to the pirate with a monstrous visage and a feather in their cap. They'll carry a silver hook and wear their heart, but not on their sleeve...
- DeMarco
Gallery:
The image shared across official social channels
The code hidden in the chest.

Meeting with T
Source: Sea of Thieves Twitter
Details: For "#SotGear", Sea of Thieves shared an image across official social channels of a pirate wearing the Pirate Lord Hat. The post is captioned:
- In this image, the Fallen Sea Dog Lantern can be seen hidden behind a barrel to the left.
- The "cap with a sizeable feather" mentioned in the captioned may relate to a description of a person in DeMarco's note to "T", seen inside an unlocked Great Sea Dog Chest image shared by Sea of Thieves.
Gallery:
The image shared across official social channels.
The Fallen Sea Dog Lantern hidden in the image.


Source: Sea of Thieves Twitter
Details: Sea of Thieves shared an image across official social channels of a pirate standing outside the Clothing Shop on New Golden Sands Outpost, while another stands inside. The post is captioned:
- In this image, the Fallen Sea Dog Lantern can be seen hidden under the table inside.
- The close pirate is wearing the Rotten Bilge Rat Hook and Inky Kraken Eyepatch, while the pirate inside the shop is wearing the Ruffian Sea Dog Pegleg and their hair is the Castaway Bilge Rat Hair, the same hairstyle as Burnin' Tony's.
Gallery:
The image shared across official social channels.
The Fallen Sea Dog Lantern hidden in the image.


Source: Sea of Thieves Twitter
Details: Sea of Thieves shared an image of a chest full of sand, with a faint grid of letters at the top. 14 minutes later, the same image was posted, this time with a full word search showing. A number of potentially relevant words can be found in this grid.
| View the word search | |||||||||||||||||||||||||
|---|---|---|---|---|---|---|---|---|---|---|---|---|---|---|---|---|---|---|---|---|---|---|---|---|---|
| A | B | C | D | E | F | G | H | I | J | K | L | M | N | O | P | Q | R | S | T | U | V | W | X | Y | |
| 1 | S | D | W | T | U | C | Y | L | T | A | P | J | P | E | H | H | B | U | H | V | T | F | O | N | I |
| 2 | M | V | X | E | Q | Z | B | F | S | R | B | S | X | P | E | B | J | R | J | A | B | E | P | I | L |
| 3 | V | N | O | F | P | K | A | P | C | Z | U | S | T | G | B | N | H | E | T | Y | A | T | B | N | S |
| 4 | S | T | P | F | S | T | I | T | C | H | E | R | J | I | M | V | U | L | E | F | C | W | O | B | S |
| 5 | H | E | O | D | D | O | F | S | A | S | I | C | A | P | O | I | M | L | K | Z | R | V | O | P | E |
| 6 | K | R | N | U | G | Y | T | O | H | R | U | A | F | D | F | H | S | I | V | M | L | J | F | A | A |
| 7 | J | W | Y | H | A | I | E | S | N | E | N | W | I | K | O | L | T | K | E | A | T | E | U | R | D |
| 8 | N | G | T | G | U | I | L | T | Y | U | P | E | Y | E | V | C | I | M | O | Z | N | S | Y | E | O |
| 9 | O | L | S | C | E | O | B | D | Y | B | I | A | M | R | N | I | R | W | I | E | A | T | R | B | G |
| 10 | A | B | S | N | C | N | L | I | Q | S | G | U | Z | M | J | T | O | A | H | K | I | L | R | T | S |
| 11 | W | I | L | K | M | R | A | L | U | B | X | P | S | A | I | E | A | R | M | W | N | U | G | E | A |
| 12 | B | E | F | Y | E | E | V | D | O | O | U | W | M | B | A | N | H | E | A | E | S | V | D | E | R |
| 13 | C | W | R | S | H | A | F | W | G | R | P | A | C | R | E | X | R | T | S | S | D | E | I | V | S |
| 14 | S | L | E | O | Y | O | B | I | T | E | R | U | N | S | G | L | W | Q | N | G | E | Z | C | A | E |
| 15 | Z | A | N | D | Z | T | E | O | S | A | P | F | O | G | O | H | E | P | E | Y | M | O | Y | M | H |
| 16 | D | H | T | W | C | B | A | K | N | E | W | O | L | N | R | I | A | T | R | N | D | F | Q | L | Z |
| 17 | F | M | L | Y | E | A | B | T | O | L | A | S | P | R | B | U | D | R | E | D | R | U | M | E | M |
| 18 | M | Q | E | H | A | P | A | E | R | N | O | D | C | T | E | V | S | S | M | L | W | L | I | O | G |
| 19 | D | P | O | L | G | E | S | Y | N | R | T | A | C | O | G | H | D | G | Q | R | N | R | S | E | N |
| 20 | I | T | P | T | U | T | G | O | N | T | A | L | R | S | V | E | M | G | W | E | I | C | J | A | V |
| 21 | T | M | O | K | S | W | A | S | E | R | V | A | N | T | J | N | A | K | S | D | Y | B | P | L | E |
| 22 | J | R | L | N | Y | I | C | K | S | D | E | I | L | X | B | G | C | R | E | T | F | W | S | A | H |
| 23 | S | L | D | H | W | N | E | H | P | L | R | H | I | R | E | A | O | S | B | E | O | U | D | T | R |
| 24 | Q | B | O | E | X | C | A | D | N | A | W | U | O | F | D | T | E | M | R | S | I | O | Y | S | U |
| 25 | L | E | Y | L | N | A | M | E | P | T | R | A | Z | F | O | L | C | A | K | G | L | N | E | B | O |
Gallery:
The sand-covered word search.
The full word search.


Source: Sea of Thieves Twitter
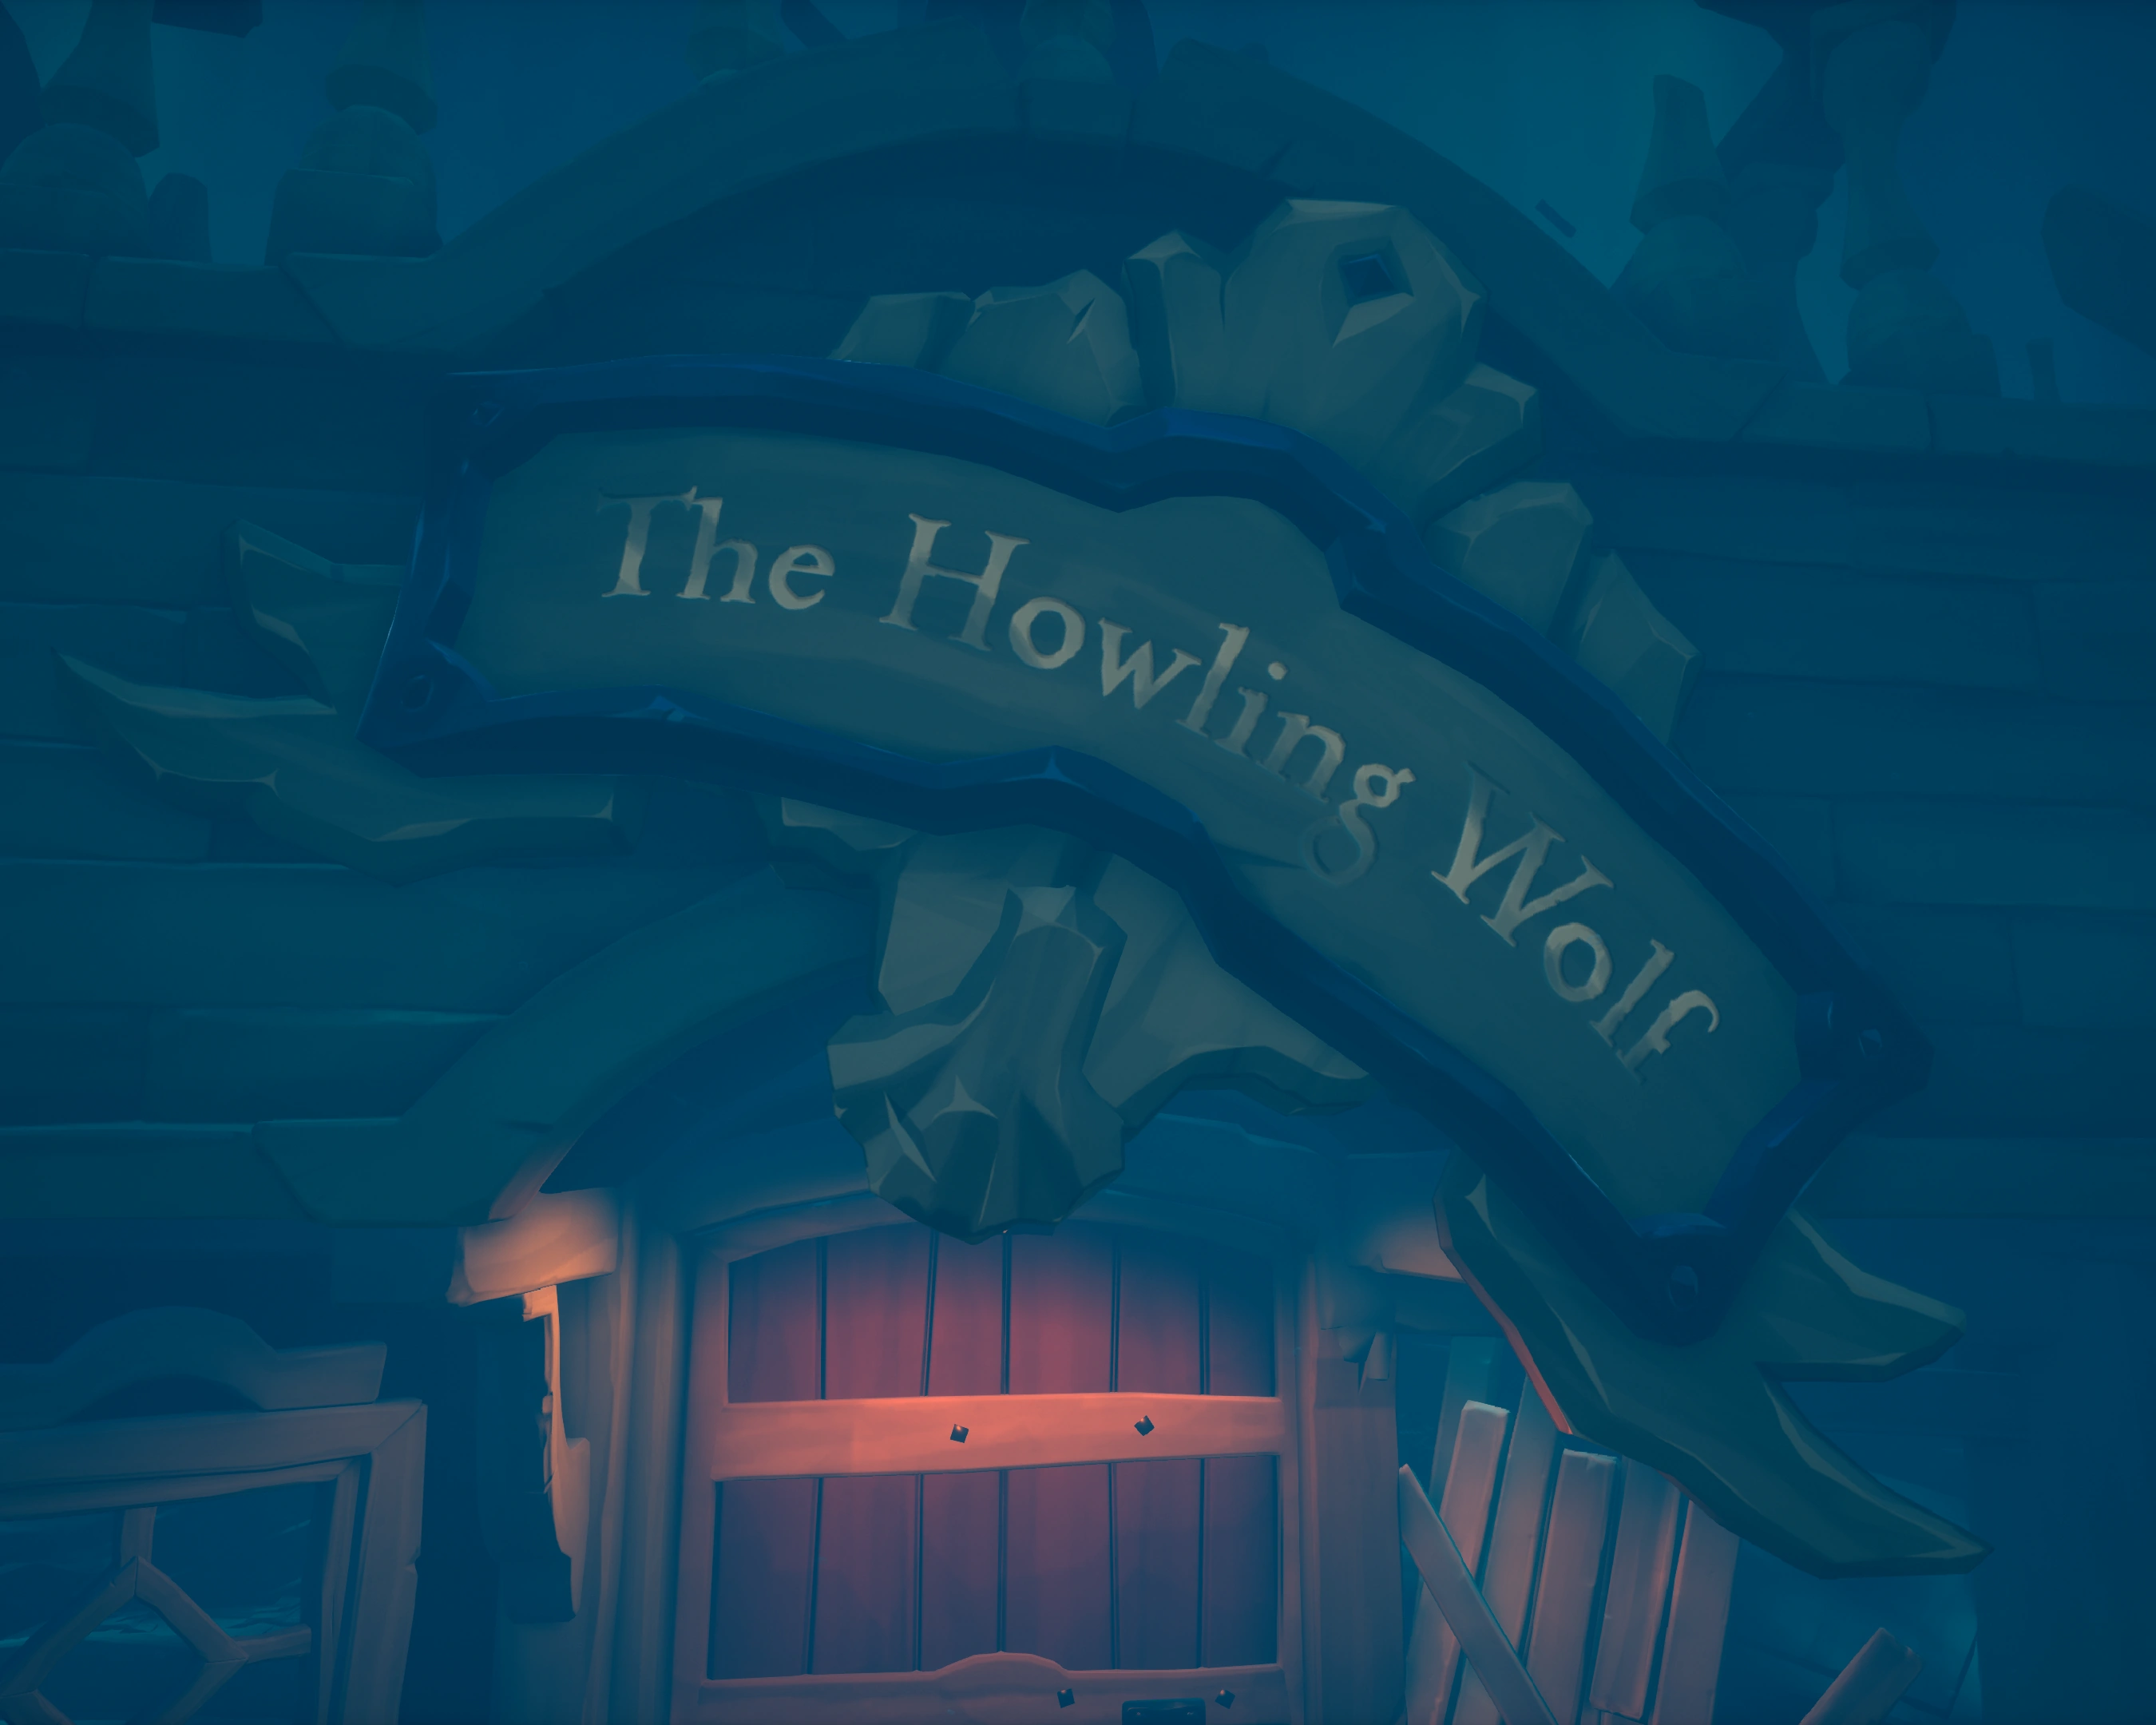
Details: For "#TriviaTuesday", Sea of Thieves shared a post about Burnin' Tony, the trader located on Ruby's Fall.
Burnin’ Tony is a trader with ties to the Merchant Alliance and one of their few contacts who’s brave enough to establish himself in the dangerous Devil’s Roar. This may have to do with Tony’s past, which featured a significant number of unexplained fires… #TriviaTuesday
- Tony's name and occupation both begin with "T", making him a prime candidate for the identity of "T".
The image shared across official social channels.

Details: Instead of the Burnin' Tony post which was shared across most other official social channels for #TriviaTuesday", the Sea of Thieves' Xbox Club feed shared a post about Sudds at The North Star Seapost. The post is captioned:
- While the trivia itself seems unrelated to the mystery, the same pirate from the Clothing Shop post can be seen in the background.
- The pirate's hair is the Castaway Bilge Rat Hair, the same hairstyle used by Burnin' Tony.
Gallery:
The image shared on Sea of Thieves' Xbox Club feed.

Source: Sea of Thieves Twitter
Details: For "#SotGear", Sea of Thieves shared an image across official social channels of a pirate wearing the The Loveable Rogues Tattoo Set. The post is captioned:
Some pirates end up being so popular, it really warms the heart. Visit all the Legends of the Sea that Umbra categorises as The Loveable Rogues, and you can wear this heart-filled tattoo in tribute to these passionate picaroons!
- In this image, the Fallen Sea Dog Lantern can be seen hidden behind a Vanity Chest to the right.
- The tattoo may relate to DeMarco's note to "T", describing a person "wear[ing] their heart, but not on their sleeve". (Read more)
Gallery:
The image shared across official social channels.

Interacting with Burnin' Tony while wearing the Pirate Lord Hat, Inky Kraken Eyepatch, Ruffian Sea Dog Pegleg, The Loveable Rogues Tattoo Set, and carrying the Fallen Sea Dog Lantern will reveal the dialogue noted below.
Burnin' Tony
Ah! It's you. DeMarco told me you'd come for this logbook once the coast was clear. Thing is... I'm not sure it'll help you find him. He swore he was being hunted, y'see.
Sure enough, his sister turned up just as we he was leaving. They had a blazing row, let me tell you! A scorching, heated, fiery...
Ahem. Anyway, that's why he encoded the final leg of his journey and hid it in a chest with his belongings. And that's when a funny thing happened.
See, he was so keen to get away from Lesedi, he forgot to stash his secret to breaking the code! But then... Well, I don't know what came over me. It burned so brightly...
I buried the log so I wouldn't be tempted again. I'll dig it up, so stop by in the future if you want to read it once I'm done!
As for the secret stuff, I s'pose it must be scattered to the four winds by now. Um, Sorry about that...-
-
-
-
Fate of The Howling Wolf and crew
Details: DeMarco's Ship Log soon after the first interactions with Burnin' Tony. It can be found behind Burnin' Tony among some broken crates.
The logbook details DeMarco's preparations for a secretive journey through the Devil's Shroud to an unknown destination. Several of the stops mentioned here are the meetings seen via lantern. The log reads as follows:
Read DeMarco's Ship Log
Page 1
Day 1: Preparing to depart, but the Midnight Prowler is too well-known. Will need a shipwright!
Day 3: Messages sent to those who can (and will still) help me in secret. Time to find a Rowboat...
Day 4: Met Scarlett atop Marauder's Arch. A Galleon will be waiting for me. Now for supplies
Day 6. Tad was not happy meeting at Devil's Thirst, but at last I have supplies for the crossing.
Day 7: I've decided I have another stop to make. The Sea of Thieves should remember me fondly!
Day 9: My debt to Colin has been settled. Now I can leave Wanderers Refuge with a clear conscience.-
-
-
-
Page 2
Day 10: Made arrangements to have this log collected. If I fail, it will be the only record of my death.
Day 11: So long, Smuggler's Bay. Thanks to Tracy, my ship will soon have a crew to help me sail.
Day 12: Met my crew. As requested, all are strangers to me. They seem in high spirits.
Day 13: Sailing for Discovery Ridge. Calm waters so far. This is starting to feel very real...
Day 14: A small scuffle among the crew. A split lip and some sour looks, but nothing to worry about.
Day 15: As promised, the Scribe, Umbra, furnished me with a path through the Shroud.-
-
-
-
Page 3
Day 16: Sails on the horizon - familiar ones. Is someone pursuing us? I fear it may be so...
Day 17: Those same sails! There can be no doubt. Someone is hunting me, and gaining ground.
Day 18: The crew seem anxious. I hear them whispering. And the sails are coming closer.
Day 20: On course to Burnin' Tony. He will hide the log until my contact comes for it.
Day 21: No choice now. I've encoded the chart with our planned route. Still need to hide the key...
Day 22: It's her. It has to be. But did someone send her? Sister, what have you done...?-
-
-
-
Page 4
(Strange... It looks like this page has been ripped out of the log. Who might have done this?)
Gallery:
DeMarco's Ship Log among broken crates.
Close up of DeMarco's Ship Log.


Details: Burned Fragments of paper, as described by Burnin' Tony, were found at random on the beaches of islands, much like a Message in a Bottle. Each Fragment begins with a grid coordinate, followed by a series of directions and number of paces to follow for each.
Using the grid coordinate from the Burned Fragments as a starting point on the "word search" posted earlier, the instructions can be used as a path on the grid to spell out a word. This is done by using the columns as the lettered coordinates and the rows as numbered coordinates, in the same way as the Map Table coordinates are laid out.
A tweet by Sea of Thieves confirmed the correct order of these words, revealing the path taken and eventual wreck location of DeMarco's ship, The Howling Wolf.
| Word | Fragment text |
|---|---|
| PASSAGE | E3. Four Paces South. Three Paces East. Two Paces North-East. One Pace West. Eight Paces South. Six Paces East. |
| OF | Q10. Four Paces North-West. |
| THE | B20. Two Paces North-East. Eleven Paces East. |
| HOWLING | D18. Four Paces North. Three Paces North-West. Seven Paces East. One Pace North. Two Paces West. Three Paces South-East. |
| WOLF | Q14. Four Paces North. Four Paces North-East. Six Paces West. |
| AIM | X20. Three Paces West. Four Paces West. |
| FOR | L15. Five Paces North-East. Six Paces East." |
| BARNACLE | No note found - confirmed by tweet |
| CAY | G22. One Pace North. Four Paces South-West. |
| BEAR | W3. Four Paces South-West. One Pace East. Three Paces South-East. |
| NW | V25. Three Paces North. |
| PAST | E3. Four Paces Pouth. Two Paces South-West. Seven Paces South." |
| OUR | Q10. Six Paces North. Six Paces South-East. |
| OLD | W4. Two Paces South-West. Seven Paces West." |
| HOME | H23. Three Paces North. Nine Paces East. Two Paces North-West. |
| DUE | B1. Three Paces East. One Pace South-West. |
| NORTH | P21. Two Paces North-West. Six Paces North. Four Paces East. One Pace North-West. |
| CLEAR | G22. Six Paces North-East. Two Paces South-East. Two Paces North-East. Three Paces North-West. |
| THE | U1. Two Paces West. Six Paces South. |
| OLD | K18. Two Paces North-East. Eight Paces East. |
| FORT | O6. One Pace North. Six Paces East. Four Paces North. |
| TURN | No note found - confirmed by tweet |
| BEFORE | G2. Three Paces West. Two Paces South. One Pace South-West. Eight Paces South. Five Paces South East. |
| THE | J25. Two Paces North-West. Five Paces North. |
| BASTION | B10. Five Paces South. Seven Paces East. One Pace North. One Pace West. Four Paces West. Eight Paces South. |
| HOLD | No note found - confirmed by tweet |
| COURSE | F24. Ten Paces North. Three Paces North-East. Nine Paces East. Two Paces South-East. Two Paces East." |
| INTO | K9. Four Paces East. Two Paces North-East. Two Paces North-West. |
| THE | No note found - confirmed by tweet |
| SHROUD | I22. One Pace South West. Three Paces East. Three Paces North-West. Three Paces West. Four Paces North-West. |
| View the grid | |||||||||||||||||||||||||
|---|---|---|---|---|---|---|---|---|---|---|---|---|---|---|---|---|---|---|---|---|---|---|---|---|---|
| A | B | C | D | E | F | G | H | I | J | K | L | M | N | O | P | Q | R | S | T | U | V | W | X | Y | |
| 1 | S | D | W | T | U | C | Y | L | T | A | P | J | P | E | H | H | B | U | H | V | T | F | O | N | I |
| 2 | M | V | X | E | Q | Z | B | F | S | R | B | S | X | P | E | B | J | R | J | A | B | E | P | I | L |
| 3 | V | N | O | F | P | K | A | P | C | Z | U | S | T | G | B | N | H | E | T | Y | A | T | B | N | S |
| 4 | S | T | P | F | S | T | I | T | C | H | E | R | J | I | M | V | U | L | E | F | C | W | O | B | S |
| 5 | H | E | O | D | D | O | F | S | A | S | I | C | A | P | O | I | M | L | K | Z | R | V | O | P | E |
| 6 | K | R | N | U | G | Y | T | O | H | R | U | A | F | D | F | H | S | I | V | M | L | J | F | A | A |
| 7 | J | W | Y | H | A | I | E | S | N | E | N | W | I | K | O | L | T | K | E | A | T | E | U | R | D |
| 8 | N | G | T | G | U | I | L | T | Y | U | P | E | Y | E | V | C | I | M | O | Z | N | S | Y | E | O |
| 9 | O | L | S | C | E | O | B | D | Y | B | I | A | M | R | N | I | R | W | I | E | A | T | R | B | G |
| 10 | A | B | S | N | C | N | L | I | Q | S | G | U | Z | M | J | T | O | A | H | K | I | L | R | T | S |
| 11 | W | I | L | K | M | R | A | L | U | B | X | P | S | A | I | E | A | R | M | W | N | U | G | E | A |
| 12 | B | E | F | Y | E | E | V | D | O | O | U | W | M | B | A | N | H | E | A | E | S | V | D | E | R |
| 13 | C | W | R | S | H | A | F | W | G | R | P | A | C | R | E | X | R | T | S | S | D | E | I | V | S |
| 14 | S | L | E | O | Y | O | B | I | T | E | R | U | N | S | G | L | W | Q | N | G | E | Z | C | A | E |
| 15 | Z | A | N | D | Z | T | E | O | S | A | P | F | O | G | O | H | E | P | E | Y | M | O | Y | M | H |
| 16 | D | H | T | W | C | B | A | K | N | E | W | O | L | N | R | I | A | T | R | N | D | F | Q | L | Z |
| 17 | F | M | L | Y | E | A | B | T | O | L | A | S | P | R | B | U | D | R | E | D | R | U | M | E | M |
| 18 | M | Q | E | H | A | P | A | E | R | N | O | D | C | T | E | V | S | S | M | L | W | L | I | O | G |
| 19 | D | P | O | L | G | E | S | Y | N | R | T | A | C | O | G | H | D | G | Q | R | N | R | S | E | N |
| 20 | I | T | P | T | U | T | G | O | N | T | A | L | R | S | V | E | M | G | W | E | I | C | J | A | V |
| 21 | T | M | O | K | S | W | A | S | E | R | V | A | N | T | J | N | A | K | S | D | Y | B | P | L | E |
| 22 | J | R | L | N | Y | I | C | K | S | D | E | I | L | X | B | G | C | R | E | T | F | W | S | A | H |
| 23 | S | L | D | H | W | N | E | H | P | L | R | H | I | R | E | A | O | S | B | E | O | U | D | T | R |
| 24 | Q | B | O | E | X | C | A | D | N | A | W | U | O | F | D | T | E | M | R | S | I | O | Y | S | U |
| 25 | L | E | Y | L | N | A | M | E | P | T | R | A | Z | F | O | L | C | A | K | G | L | N | E | B | O |
Gallery:
A Burned Fragment.[1]
The Pirate Chat wheel while holding a Burned Fragment.[2]
![A Burned Fragment.[1]](https://static.wikia.nocookie.net/seaofthieves_gamepedia/images/a/ad/Mystery_01_0723_Burned_Fragment.png/revision/latest?cb=20220723121403)
![The Pirate Chat wheel while holding a Burned Fragment.[2]](https://static.wikia.nocookie.net/seaofthieves_gamepedia/images/3/39/Mystery_01_0723_Burned_Fragment_Wheel.png/revision/latest?cb=20220723121402)
A Fragment translating to "PASSAGE".[2]
A Fragment translating to "OF".[3]
A Fragment translating to "THE".[4]
A Fragment translating to "HOWLING".[5]
A Fragment translating to "WOLF".[6]
A Fragment translating to "AIM".[7]
A Fragment translating to "FOR".[8]
A Fragment translating to "CAY".[9]
A Fragment translating to "BEAR".[10]
A Fragment translating to "NW".[11]
A Fragment translating to "PAST".[12]
A Fragment translating to "OUR".[13]
A Fragment translating to "OLD".[14]
A Fragment translating to "HOME".[15]
A Fragment translating to "DUE".[16]
A Fragment translating to "NORTH".[17]
A Fragment translating to "CLEAR".[18]
A Fragment translating to "THE".[19]
A Fragment translating to "OLD".[20]
A Fragment translating to "FORT".[21]
A Fragment translating to "BEFORE".[22]
A Fragment translating to "THE".[7]
A Fragment translating to "BASTION".[23]
A Fragment translating to "COURSE".[4]
A Fragment translating to "INTO".[24]
A Fragment translating to "SHROUD".[25]
![A Fragment translating to "PASSAGE".[2]](https://static.wikia.nocookie.net/seaofthieves_gamepedia/images/2/24/Mystery_01_0724_Burned_Fragment_E3_Passage.png/revision/latest?cb=20220724150716)
![A Fragment translating to "OF".[3]](https://static.wikia.nocookie.net/seaofthieves_gamepedia/images/f/fd/Mystery_01_0724_Burned_Fragment_Q10_Of.jpg/revision/latest?cb=20220724150743)
![A Fragment translating to "THE".[4]](https://static.wikia.nocookie.net/seaofthieves_gamepedia/images/b/bf/Mystery_01_0724_Burned_Fragment_B20_The.webp/revision/latest?cb=20220724150707)
![A Fragment translating to "HOWLING".[5]](https://static.wikia.nocookie.net/seaofthieves_gamepedia/images/8/86/Mystery_01_0724_Burned_Fragment_D18_Howling.png/revision/latest?cb=20220724150710)
![A Fragment translating to "WOLF".[6]](https://static.wikia.nocookie.net/seaofthieves_gamepedia/images/d/df/Mystery_01_0724_Burned_Fragment_Q14_Wolf.jpg/revision/latest?cb=20220725113225)
![A Fragment translating to "AIM".[7]](https://static.wikia.nocookie.net/seaofthieves_gamepedia/images/9/97/Mystery_01_0724_Burned_Fragment_X20_Aim.png/revision/latest?cb=20220724150804)
![A Fragment translating to "FOR".[8]](https://static.wikia.nocookie.net/seaofthieves_gamepedia/images/b/b5/Mystery_01_0724_Burned_Fragment_L15_For.png/revision/latest?cb=20220727115502)
![A Fragment translating to "CAY".[9]](https://static.wikia.nocookie.net/seaofthieves_gamepedia/images/8/82/Mystery_01_0730_Burned_Fragment_G22_Cay.png/revision/latest?cb=20220730200908)
![A Fragment translating to "BEAR".[10]](https://static.wikia.nocookie.net/seaofthieves_gamepedia/images/3/3e/Mystery_01_0724_Burned_Fragment_W3_Bear.png/revision/latest?cb=20220724150749)
![A Fragment translating to "NW".[11]](https://static.wikia.nocookie.net/seaofthieves_gamepedia/images/4/49/Mystery_01_0724_Burned_Fragment_V25_NW.png/revision/latest?cb=20220724150746)
![A Fragment translating to "PAST".[12]](https://static.wikia.nocookie.net/seaofthieves_gamepedia/images/7/72/Mystery_01_0724_Burned_Fragment_E3_Past.png/revision/latest?cb=20220725180339)
![A Fragment translating to "OUR".[13]](https://static.wikia.nocookie.net/seaofthieves_gamepedia/images/6/6b/Mystery_01_0724_Burned_Fragment_Q10_Our.jpg/revision/latest?cb=20220724150744)
![A Fragment translating to "OLD".[14]](https://static.wikia.nocookie.net/seaofthieves_gamepedia/images/8/89/Mystery_01_0724_Burned_Fragment_W4_Old.jpg/revision/latest?cb=20220724150751)
![A Fragment translating to "HOME".[15]](https://static.wikia.nocookie.net/seaofthieves_gamepedia/images/3/38/Mystery_01_0724_Burned_Fragment_H23_Home.jpg/revision/latest?cb=20220724150725)
![A Fragment translating to "DUE".[16]](https://static.wikia.nocookie.net/seaofthieves_gamepedia/images/c/c6/Mystery_01_0724_Burned_Fragment_B1_Due.jpg/revision/latest?cb=20220724150704)
![A Fragment translating to "NORTH".[17]](https://static.wikia.nocookie.net/seaofthieves_gamepedia/images/f/f6/Mystery_01_0724_Burned_Fragment_P21_North.jpg/revision/latest?cb=20220727115504)
![A Fragment translating to "CLEAR".[18]](https://static.wikia.nocookie.net/seaofthieves_gamepedia/images/f/f7/Mystery_01_0724_Burned_Fragment_G22_Clear.png/revision/latest?cb=20220725002803)
![A Fragment translating to "THE".[19]](https://static.wikia.nocookie.net/seaofthieves_gamepedia/images/c/c9/Mystery_01_0724_Burned_Fragment_U1_The.png/revision/latest?cb=20220727011804)
![A Fragment translating to "OLD".[20]](https://static.wikia.nocookie.net/seaofthieves_gamepedia/images/5/53/Mystery_01_0724_Burned_Fragment_K18_Old.jpg/revision/latest?cb=20220724150741)
![A Fragment translating to "FORT".[21]](https://static.wikia.nocookie.net/seaofthieves_gamepedia/images/5/51/Mystery_01_0730_Burned_Fragment_O6_Fort.jpg/revision/latest?cb=20220730220120)
![A Fragment translating to "BEFORE".[22]](https://static.wikia.nocookie.net/seaofthieves_gamepedia/images/5/5d/Mystery_01_0724_Burned_Fragment_G2_Before.jpg/revision/latest?cb=20220725010513)
![A Fragment translating to "THE".[7]](https://static.wikia.nocookie.net/seaofthieves_gamepedia/images/9/9c/Mystery_01_0724_Burned_Fragment_J25_The.png/revision/latest?cb=20220724150739)
![A Fragment translating to "BASTION".[23]](https://static.wikia.nocookie.net/seaofthieves_gamepedia/images/0/0d/Mystery_01_0724_Burned_Fragment_B10_Bastion.jpg/revision/latest?cb=20220724150705)
![A Fragment translating to "COURSE".[4]](https://static.wikia.nocookie.net/seaofthieves_gamepedia/images/2/29/Mystery_01_0724_Burned_Fragment_F24_Course.webp/revision/latest?cb=20220724150718)
![A Fragment translating to "INTO".[24]](https://static.wikia.nocookie.net/seaofthieves_gamepedia/images/c/c6/Mystery_01_0724_Burned_Fragment_K9_Into.webp/revision/latest?cb=20220728123301)
![A Fragment translating to "SHROUD".[25]](https://static.wikia.nocookie.net/seaofthieves_gamepedia/images/b/b9/Mystery_01_0724_Burned_Fragment_I22_Shroud.png/revision/latest?cb=20220724150724)
Source: Sea of Thieves Twitter
Details: Sea of Thieves shared a post across their social media detailing a complete path of The Howling Wolf with an accompanying image of debris underwater.
Passage of the Howling Wolf:
Aim for Barnacle Cay
Bear NW
Past our old home
Due north
Clear the old Fort
Turn before the bastion
Hold course
Into the Shroud...
Gallery:
The image share on Twitter.

Details: Putting together words decoded from the Burned Fragments reveals the path of DeMarco's ship, The Howling Wolf. The wreck of the galleon can be found along this path at the top-central section of map coordinate J-7. The wreck is found deep underwater, following the path of debris and air bubbles. It features the following details:
- Nameplate reading "The Howling Wolf"
- Hull of the Midnight Prowl
- Sea Dog Figurehead
- Bowl of fruit with peelable banana
- Bubbles for breathing
- Various interactive object, similar to Shipwreck Graveyards ship
While holding the Fallen Sea Dog Lantern, three journals written by DeMarco's crew can be found around the shipwreck, hinting to a ghostly vision of the Pirate Lord on Thieves' Haven.
Main deck journal found inside the captain's quarters provides the island clue, "massive island" (Thieves' Haven).
Journal on shelf above bed in captain's quarters
Not sure how much more I can stand. Trying to pretend like we're going to sail merrily into the mist with Captain Swagger, knowing what's going to happen to him?
At least I can see why the boss wanted to meet us on such a massive island. That's smart thinking. Nice and devious, like pirates should be.
We'll be devious, too. Wait until the 'Captain' lets his guard down, and then - no more swagger...-
-
-
-
Mid-deck journal found between two barrels provides a landmark on Thieves' Haven, "old painting" ("Mermaid's Call" painting).
Journal between barrels on middle deck
'We'll have your coin ready', they said. 'Come to the old painting', they said! They forgot to mention how many of the blummin' things there are!
If we don't find the right spot soon I'm going to eat this book, I'm that famished. Breaking the pirate code is one thing, but I didn't agree to miss dinner.
Maybe I'll cheer up once we've been paid. Nothing lifts your spirits like gold in your pocket - and a blade up your sleeve...-
-
-
-
Lower deck journal provides a time, "Witching Hour" (03:00 AM).
Journal behind the bed in the brig
Mutiny is such a strong word. I mean, if we never really meant to help send DeMarco on his way, was he really our Captain to begin with?
Besides, I lost more than my fair share of silver in that Arena of his. You can't pit pirates against one another and not expect to reap what you sow...
But before all that, we've got to get paid by whoever's organised our little deception. The Witching Hour can't come soon enough.-
-
-
-
Gallery:
The Howling Wolf's ship crest.
Journal in the Captain's quarters.
Journal on the mid-deck.
Journal in the lower deck's brig.


Details: Led to by clues in crew journals found in The Howling Wolf shipwreck, a ghostly vision of the Pirate Lord meeting with three other pirates on a rock behind the wrecked ship on Thieves' Haven can be seen while holding the Fallen Sea Dog Lantern at 03:00.
- The same pirates can also be seen hidden in a number of recent social posts.
- The male pirate seen can be seen in the Clothing Shop post, Sudds #TriviaTuesday and Stephen's Spoils #SundayVibes.
- This pirate shares a hairstyle with Burnin' Tony.
- The light haired female (Sally Marshall) pirate can be seen in the Devil's Ridge #SundayVibes.
- The dark haired female pirate can be seen in the Mutineer Rock #SundayVibes.
- The male pirate seen can be seen in the Clothing Shop post, Sudds #TriviaTuesday and Stephen's Spoils #SundayVibes.
Additionally, while holding the lantern near the Pirate Lord in the Athena's Fortune Hideout, the word "GUILTY" can be seen written many times across the walls, floor, ceiling and table.
Gallery:
"GUILTY" seen written surrounding the Pirate Lord.
The Pirate Lord meeting with the mutineers.
Close up of the Pirate Lord paying one of the mutineers.
Sally Marshall (left) and crew being paid by the Pirate Lord.
Unidentified mutineer at the meeting.
Harry Handles at the meeting.
Source: Sea of Thieves Twitter
Details: Sea of Thieves shared a post across their social media with and image of three pirates looking at a parchment with the Pirate Lord's portrait and "GUILTY" written repeatedly across the page. The accompanying caption reads:
Gallery:
The image share on Twitter.
Revealing the note requires a group of three players, each at a specific positions around the tavern in the Athena's Fortune Hideout. One player must stand behind the band in the corner behind the band near the rune tablet, while the other two players must be in Ramsey's quarters, with one standing on top of the carpet, and the third at wall by the door. This player may then interact with the revealed note on the wall while holding the Fallen Sea Dog Lantern.
The contents of the note provide a clue to finding hidden writing at Lagoon of Whispers.
The three are gone, but not all by my hand - the storm in the west took the last of them, just as day was breaking.
My influence keeps them from the Ferry. Even if their remains are found, they will be anonymous. And only truths can reveal truths...
There will be no proof I was involved. Without it, no-one will dare challenge me.
Details: Hidden writing ("SM") can be revealed at Lagoon of Whispers by holding the Fallen Sea Dog Lantern with the white Flame of Fate (obtained by dying from lightning).
The writing is located on a rock found left of Umbra. Only the two letters are visible, "SM", written vertically with the letters on their side.
This was lead to by a clue provided in the note hidden in the Pirate Lord's quarters which reads, "the storm in the west took the last of them, just as day was breaking". Suggesting the time, rough location, and method (white flame of fate) necessary to find the writing.
The letters are later revealed to be the initials of Sally Marshall, one of the three mutineers from The Howling Wolf.
Gallery:
The hidden writing revealed by white Flame of Fate.

Source: Sea of Thieves Twitter
Details: Sea of Thieves tweeted an image of a character dressed like an Order of Souls representative. They are holding a glowing parchment that reads:
The roman numerals on the note are "22" and "8", indicating a date of August 22 when the next clue was revealed.
The caption accompanying the post reads:
Gallery:
The image shared on Twitter.

Source: Sea of Thieves Twitter
Details: Sea of Thieves tweeted an image of an Order of Souls representative holding a skull belonging to one female mutineer of DeMarco's crew, now identified as Sally Marshall. The caption accompanying the post reads:
"Welcome. I sense you seek the truth, as do I. However the memories of this one, while important, remain sealed. If you know what was true of this pirate in life, then that will be enough to help us extract their memories in death…"
In the tweet replies, Sea of Thieves posted a series of polls relating to previous appearances of this mutineer. If the community votes correctly, the next poll is posted.
| Question | Options | Answer and reasoning |
|---|---|---|
| What do you believe their name to have been? |
|
"SM" revealed on a rock by Fallen Sea Dog Lantern with the white Flame of Fate on Lagoon of Whispers. (Read more) |
| It seems you're correct… Through what instrument did they bring song to those around them? |
|
Pirate seen with a Hurdy-Gurdy in Mutineer Rock #SundayVibes post. |
| We're close now… What sails did they adorn their vessel with long ago? |
|
In-game description for Sails of the Bonny Belle is "Sails from a vessel captained by the notorious Sally Marshall as she struggled to make amends for past misdeeds...". |
| One more should do it… What caused them to die? |
|
White Flame of Fate, obtained by dying from lightning reveals "SM" on Lagoon of Whispers. (Read more) |
Gallery:
The image shared on Twitter.

Source: Sea of Thieves Twitter
Details: Sea of Thieves tweeted a video showing a point of view of Sally Marshall, one of the mutineers of DeMarco's crew. The memories were recovered from her skull after the community correctly answered questions about her life and death. The caption accompanying the post reads:
The stranger disappears as you watch the memory...
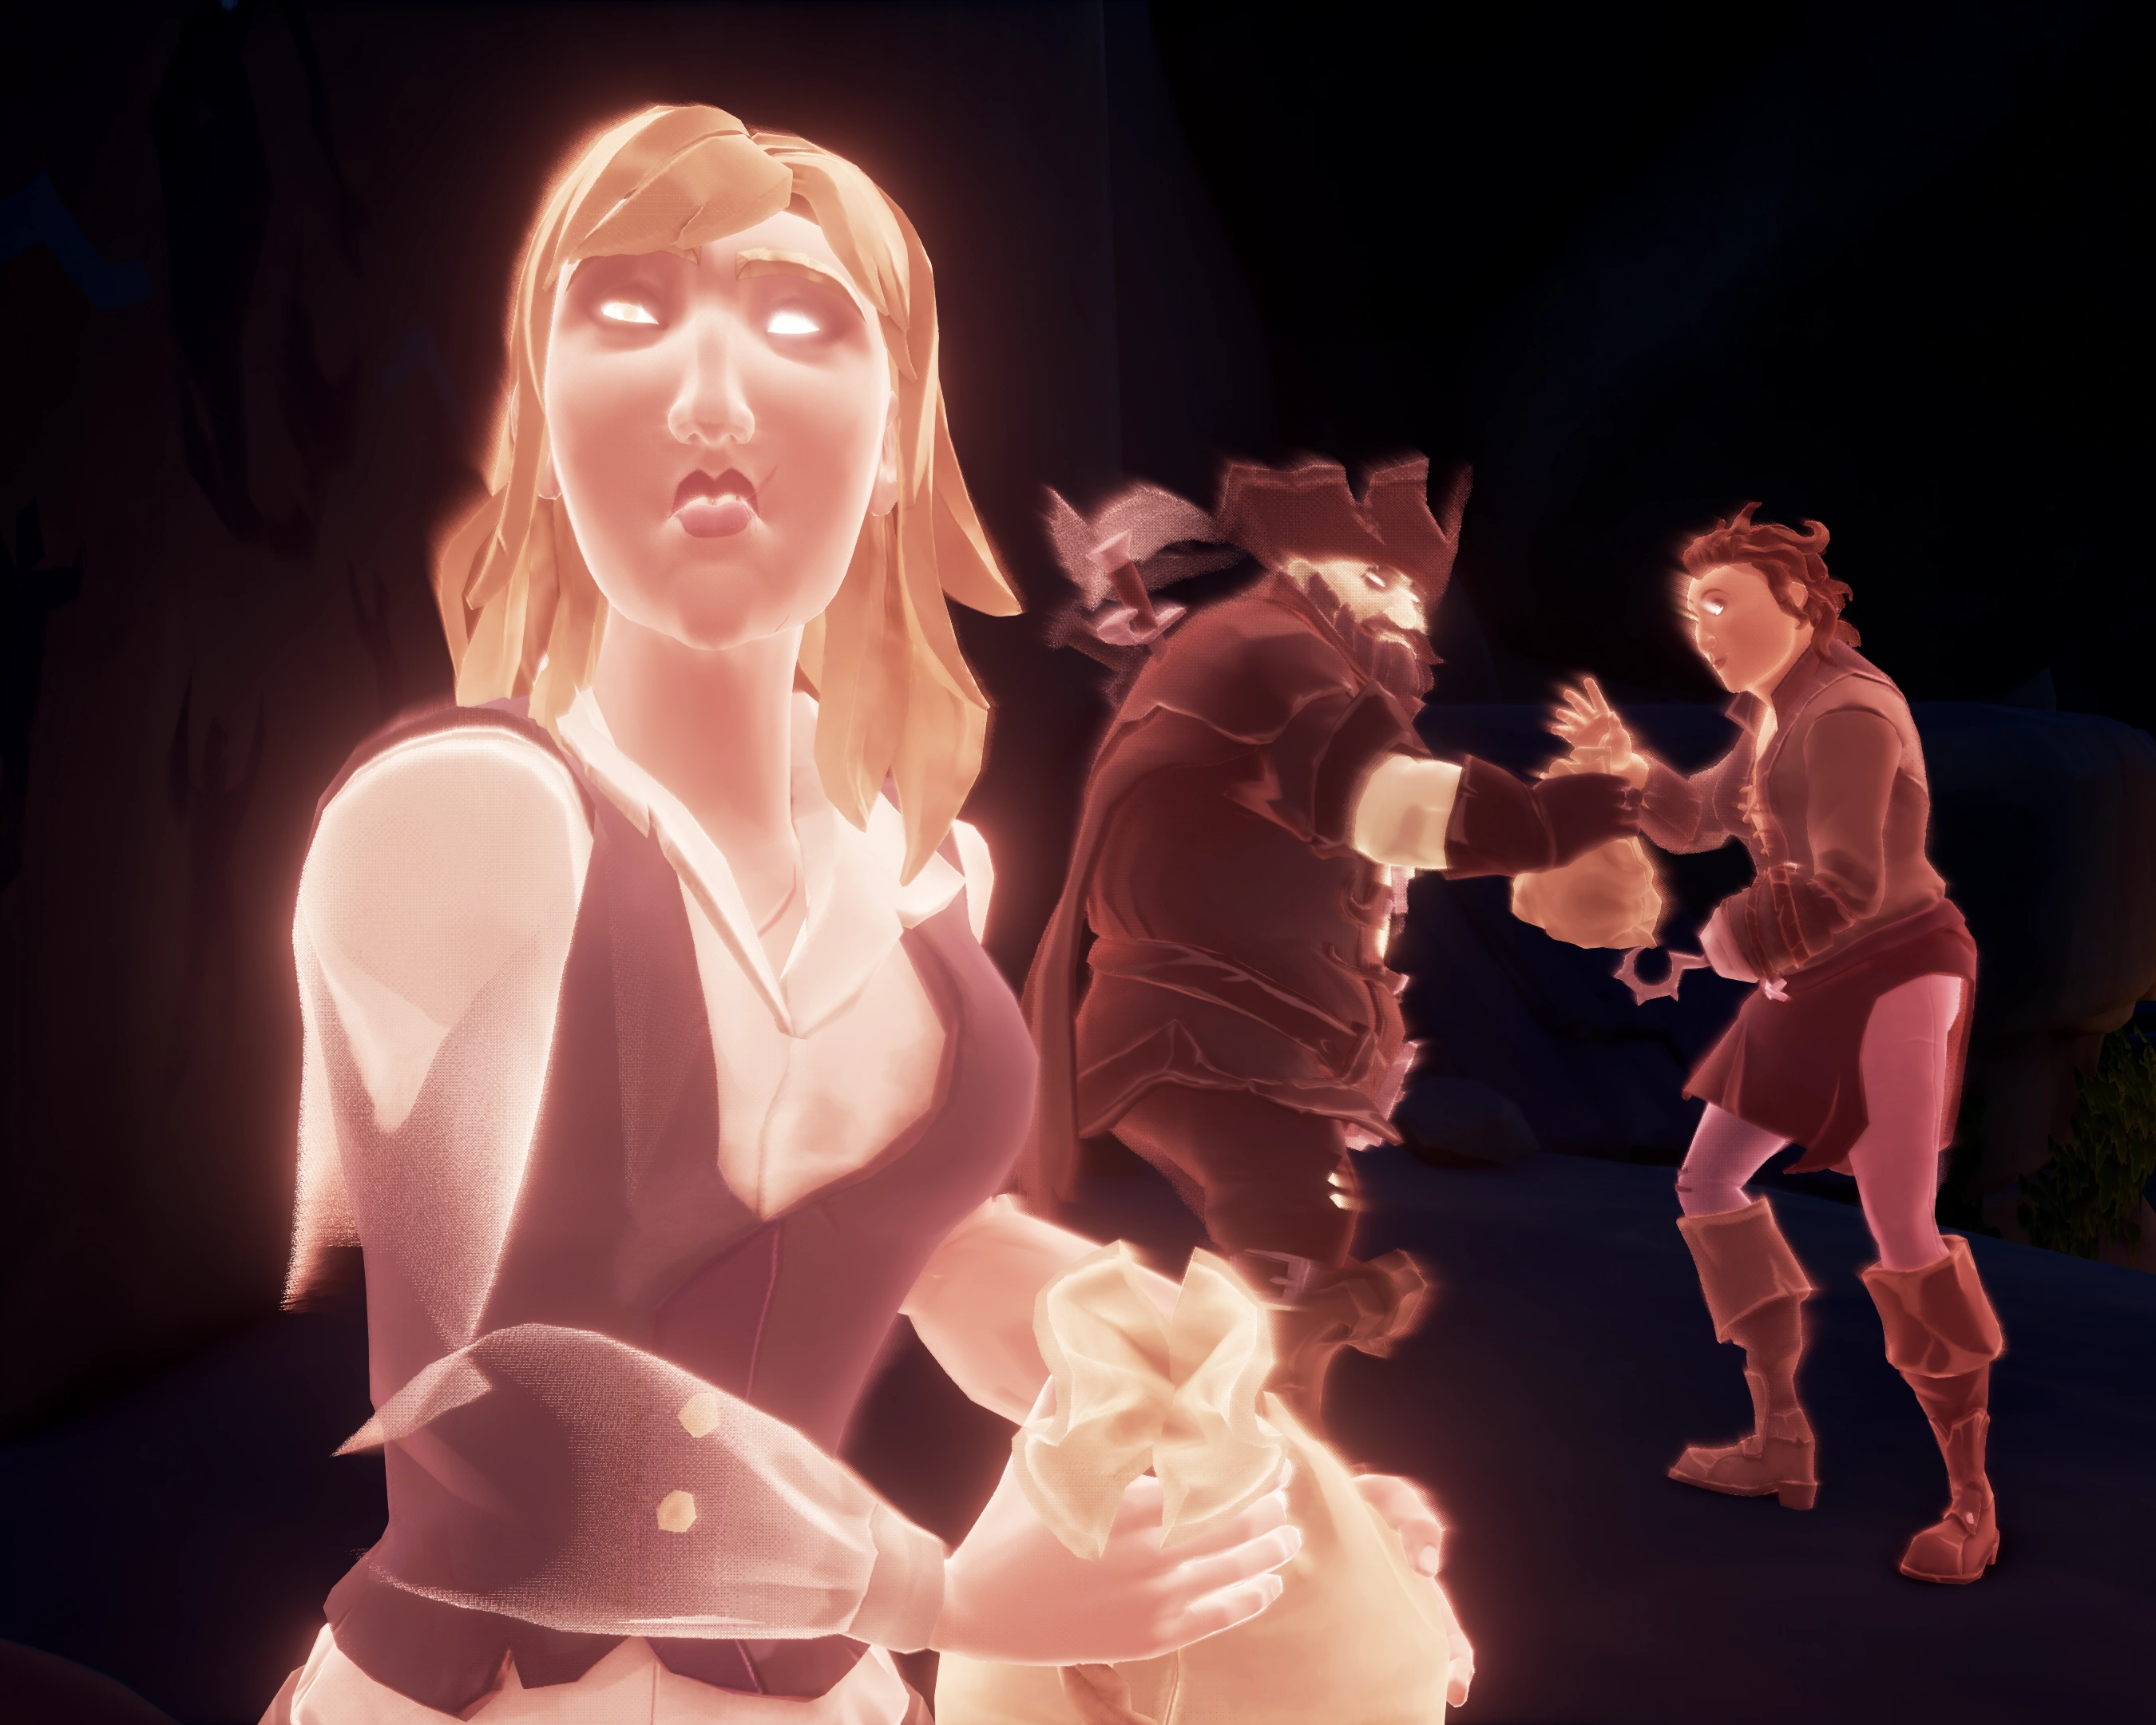
The clip shows the following key points from the memories of Sally Marshall:
- On a Sloop between a Reaper's Bones Galleon and an Athena's Fortune Galleon battling each other at The Reaper's Hideout.
- On a Sloop at The Reaper's Hideout.
- Gathering supplies from barrels on a Seapost with a Sloop docked.
- Repairing a damaged ship hole.
- Firing off a Signal Flare near Sailors' Bounty.
- Petting a dog, monkey and parrot with the other mutinous crew members at New Golden Sands Outpost.
- Getting bitten by a snake on Devil's Ridge with the male crew member.
- Boarding a Sloop from Devil's Ridge.
- Viewing Plunder Valley on the Map Table.
- Sailing past Wanderers Refuge.
- Fishing for Splashtails on a Galleon with the other crew members.
- A Sloop is shot at by a cannon from Crow's Nest Fortress.
- Viewing an approaching Athena's Fortune Galleon through a spyglass near Plunder Outpost.
- Watching the male crew member vomit while sleeping in the Captain's Bed on a Galleon.
- Killed by lightning and knocked off a Galleon at Lagoon of Whispers.
Details: Hidden writing ("HH") can be revealed at Devil's Ridge by holding the Fallen Sea Dog Lantern with the purple Flame of Fate (obtained by dying from venom) between 12:00 and 13:00.
The writing is located in the cave over some glowing, blue mushrooms.
This was lead to by clues provided in the video showing Sally Marshall's memories. In the clip, the male mutineer was seen to be bitten by a snake on Devil's Ridge, suggesting the location and method (purple flame of fate) necessary to find the writing.
The letters are later revealed to be the initials of Harry Handles, one of the three mutineers from The Howling Wolf.
Gallery:
The hidden writing revealed by purple Flame of Fate.

Source: Sea of Thieves Twitter
Details: Sea of Thieves tweeted an image of a glowing parchment that reads:
The caption accompanying the post reads:
The roman numerals on the note are "25" and "8", indicating a date of August 25 when the next clue was revealed.
This note would be a follow-up to the previous parchment tweet which gave the meeting date that revealed the Sally Marshall's memories. Sally's memories lead to the skull and "HH" initials hidden on Devil's Ridge. The appearance of this new note and meeting suggested that memories would be extracted from the skull of "HH", later identified as Harry Handles.
Gallery:
The image shared on Twitter.

Source: Sea of Thieves Twitter
Details: Sea of Thieves tweeted an image of an Order of Souls representative holding a skull belonging to the male mutineer of DeMarco's crew, now identified as Harry Handles. The caption accompanying the post reads:
"We must hurry, eyes watch us and this one's memories are again sealed. If we can identify truths of who this pirate was, then hopefully their memories will lead us towards the closure we seek, as much as the reality may pain us..."
In the tweet replies, Sea of Thieves posted a series of polls relating to previous appearances of this mutineer. If the community votes correctly, the next poll is posted.
| Question | Options | Answer and reasoning |
|---|---|---|
| By what name do you believe they were known? |
|
Harry's skull at Devil's Ridge was discovered using clues from Sally Marshall's memories which featured glimpses of the male mutineer being poisoned by a snake at Devil's Ridge. (Read more) |
| It appears you're correct... what style of ship did they have a predilection towards? |
|
Harry was seen with the Sails of the Wailing Barnacle on his sloop in the Stephen's Spoils #SundayVibes tweet. |
| A little more... what instrument did they favour to rally their crews around them? |
|
In the Season Seven trailer, Harry and another mutineer can be spotted playing instruments. Harry played the drums twice in two separate scenes, while playing concertina in a third scene. |
| That seems right, but one more answer is required… how did they die? |
|
The purple Flame of Fate, obtained by dying from poison, is used to reveal their initials ("HH") on Devil's Ridge. (Read more) |
Gallery:
The image shared on Twitter.
Harry and his crewmate playing Order of Souls instruments.
Harry and his crewmate playing Gold Hoarders instruments.
Harry and his crewmate playing Merchant Alliance instruments.


Source: Sea of Thieves Twitter
Details: Sea of Thieves tweeted a video showing a point of view of Harry Handles, one of the mutineers of DeMarco's crew. The memories were recovered from his skull after the community correctly answered questions about his life and death. The caption accompanying the post reads:
The stranger vanishes while you're preoccupied.
The memories focus heavily on the mutinous crew's activities within ![]() The Devil's Roar.
The Devil's Roar.
The clip shows the following key points from the memories of Harry Handles:
- Running through Molten Sands Fortress as it erupts.
- Rowing away to a Galleon.
- While on a Galleon, viewing a ship with Ghost Sails through a spyglass.
- Steering a Galleon.
- Drinking with the other mutineers in a tavern.
- Putting out a fire on the Galleon while another mutineer repairs a damaged mast.
- Sailing east past Liar's Backbone.
- In the caves at Devil's Ridge.
- Speaking to Shelley at Ancient Spire Outpost with another mutineer as a Sloop is docked.
- Swimming up as a ship sinks.
- Jumping down into the centre of The Sunken Grove with Sally Marshall.
- Playing musical instruments with the other mutineers.
- Docking a Harpoon Rowboat to a Galleon at Galleon's Grave Outpost with Sally Marshall.
- Swimming down with Sally Marshall.
- Escaping Cinder Islet on a Rowboat.
- Cooking a Plentifin on a campfire at New Golden Sands Outpost with the other mutineers while holding a piece of half-eaten chicken.
- Steering a Galleon.
- Viewing Ancient Spire Outpost on the Map Table.
- Sailing west past Brian's Bazaar.
- Bitten by a snake on Devil's Ridge.
- Wandering into the caves on Devil's Ridge to die of venom.
Details: A skull was found in the cave of The Sunken Grove. It is the only skull still with its jawbone, located among a pile of other skulls that are all otherwise missing jawbones. Nearby, a broken music box and silver coin can be found on the ground.
Nearby, Wanda's journal can be found. Although this was already present here, there is now an added entry at the end:
[He is trapped. Find him...]
Gallery:
The journal and skulls at the camp on The Sunken Grove.
Close-up of the pile of skulls with the new skull seen at the bottom-left.
The broken music box and coin.


Lesedi's clues
Source: Sea of Thieves Twitter
Details: Sea of Thieves tweeted an image of a character dressed like an Order of Souls representative standing over a table. On the table is a parchment that reads:
This indicates a date of August 31.
The caption accompanying the post reads:
Gallery:
The image shared on Twitter.

Source: Sea of Thieves Twitter
Details: Sea of Thieves tweeted an image of an Order of Souls representative holding a skull belonging to William Davies, a currently unknown character. The caption accompanying the post reads:
"I may not have written that note, yet I foresaw your curiosity bringing you here. This one doesn't feel the same as the others, but if it holds answers then I shan't deny its voice. Once again, let us channel its truths"
In the tweet replies, Sea of Thieves posted a series of polls relating to previous appearances of this mutineer. If the community votes correctly, the next poll is posted.
| Question | Options | Answer and reasoning |
|---|---|---|
| What name do you believe they may have gone by? |
|
The skull does not belong to the remaining female mutineer, therefore it must be the male name, William Davies.
"Pat the Butcher" was the highest voted answer, and was deemed incorrect. |
| That doesn't seem right, and we need truths to break the seal… what type of animal do you feel this one had a close kinship to? |
|
The female mutineer can be seen holding a Sunset Capuchin in the memories of Sally Marshall video. William is a male name so cannot be the same pirate who owns the monkey, therefore William Davies must own the other option, Bandit Ragamuffin. |
| That seems to be correct... what food brought them the most comfort? |
|
The mutineers can be seen cooking a Honey Islehopper in the memories of Harry Handles video. The skull does not belong to any of the mutineers, therefore William Davies's comfort food must be the other option, pineapple. |
| We're getting close now... what instrument did they favour to rally those around them? |
|
The Hurdy-Gurdy is the only instrument that the female mutineer is never seen playing, therefore that must be the instrument William Davies plays. |
| Correct. This should be the final hurdle... by what means did they die? |
|
Unknown (No information was provided to confirm either option as correct.) |
Gallery:
The image shared on Twitter.

Source: Sea of Thieves YouTube
Details: Sea of Thieves posted a video of a female voice, potentially Lesedi, telling of how visions and memories seen with the Fallen Sea Dog Lantern are all lies, including the memories of the mutineers. The clip shows the inside of an Order of Souls building.
The tweet caption reads:
The YouTube video description read:
The voice says the following:
I hope so...
I smashed the music box, but I don't know if that will be enough to reach you.
You need to listen.
What you've seen, everything you've discovered - it's all been a lie.
The messages, the mutiny. None of it is real.
Trust me.
I found that out the hard way.
That lantern you're carrying?
It's just a flame, nothing special.
You've only been seeing what she wanted you to see.
We all have.
But if you can hear my voice it's not too late, the truth is still within reach.
Use my spyglass, follow the coins.
I can't wait any longer but... this is my call for help.
I know where the lies are buried, this message should find you there.
I just need...
to switch...
the skulls!
*sword slashing*
Details: Immediately after Lesedi's message video was posted, a number of silver coin piles in shapes of different letters began appearing in the same locations related to the murder mystery.
- One coin in each pile has an arrow scratched into it (see gallery below). The arrows each point in a certain direction for an undetermined purpose.
When put together, the letters spell out the word "PRISONER".
| Location | Letter | Direction of arrow |
|---|---|---|
| The Howling Wolf | P | South-east, by east by south-east |
| Smuggler's Bay | R | South by south-east |
| Discovery Ridge | I | North-east |
| The Devil's Thirst | S | North-west |
| Thieves' Haven | O | North by north-east |
| Sea Dog's Rest | N | East by north-east |
| Marauder's Arch | E | South-west, by south by south-west |
| Crook's Hollow | R | North |
Gallery:
A "P" shaped coin pile.
The direction of the arrow on the "P" shaped coin pile.
An "R" shaped coin pile.
The direction of the arrow on the "R" shaped coin pile.
An "I" shaped coin pile.
The direction of the arrow on the "I" shaped coin pile.
An "S" shaped coin pile.
The direction of the arrow on the "S" shaped coin pile.
An "O" shaped coin pile.
The direction of the arrow on the "O" shaped coin pile.
An "N" shaped coin pile.
The direction of the arrow on the "N" shaped coin pile.
An "E" shaped coin pile.[26]
The direction of the arrow on the "E" shaped coin pile.[26]
An "R" shaped coin pile.
The direction of the arrow on the "R" shaped coin pile.


![An "E" shaped coin pile.[26]](https://static.wikia.nocookie.net/seaofthieves_gamepedia/images/3/3b/Mystery_01_0901_Silver_Coins_E.png/revision/latest?cb=20220902124151)
![The direction of the arrow on the "E" shaped coin pile.[26]](https://static.wikia.nocookie.net/seaofthieves_gamepedia/images/0/0d/Mystery_01_0901_Silver_Coins_E_Compass.png/revision/latest?cb=20220902125035)


Details: Lesedi's Spyglass can be obtained from a skeleton in a hanging prisoner's cage in a cave entrance to the south side of the island. Once obtained, the item can be equipped from your Equipment Chest at any time.
The word "PRISONER" from the silver coins may allude to the spyglass's location.
When looking through the spyglass, a semi-transparent skull and cutlass can be seen overlaid on the glass. Between them is a cross shaped crack. This is visually similar to the Trapmaker's Spyglass used in The Art of the Trickster Tall Tale, potentially meant to be used for revealing a location at the cross when aligned with a particular object or landmark at the skull's eye.
Gallery:
Lesedi's Spyglass in hand.
Lesedi's Spyglass in use.
The Pirate Chat wheel for Lesedi's Spyglass.
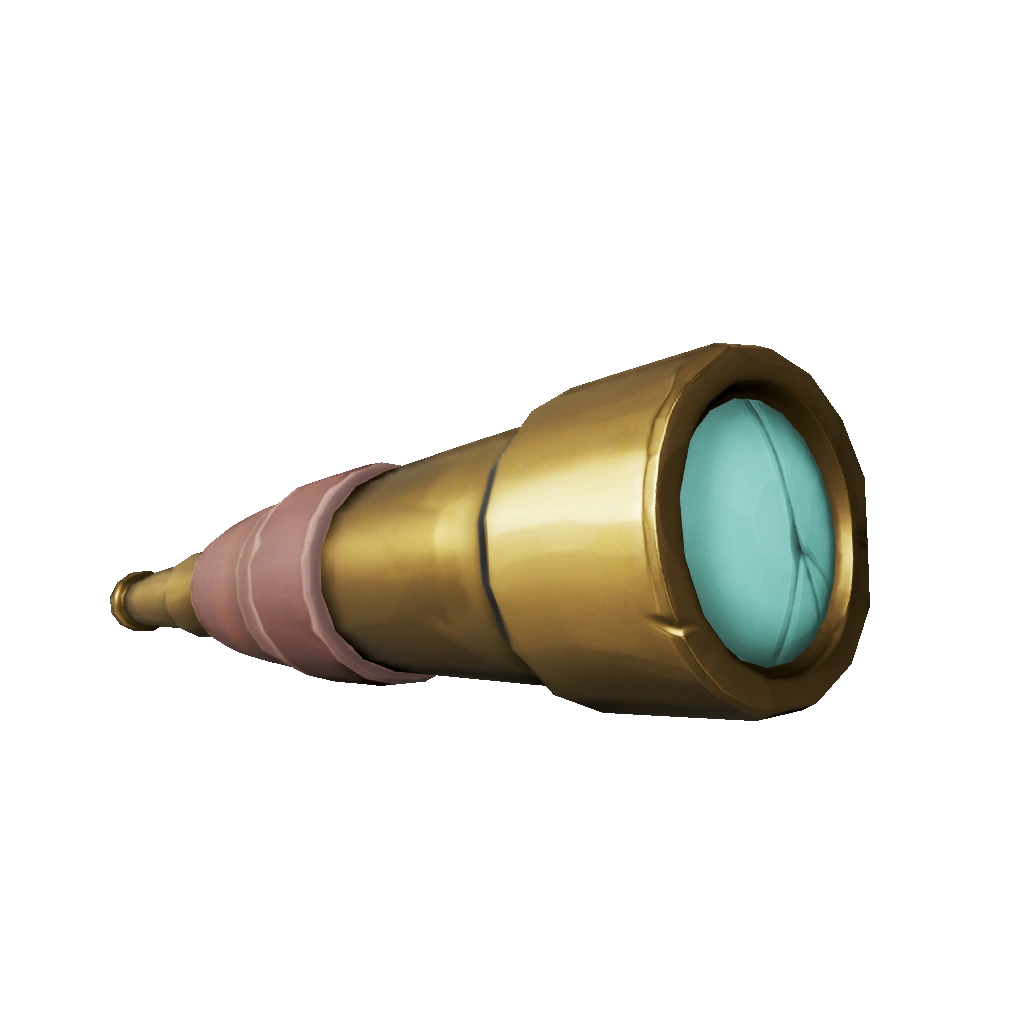
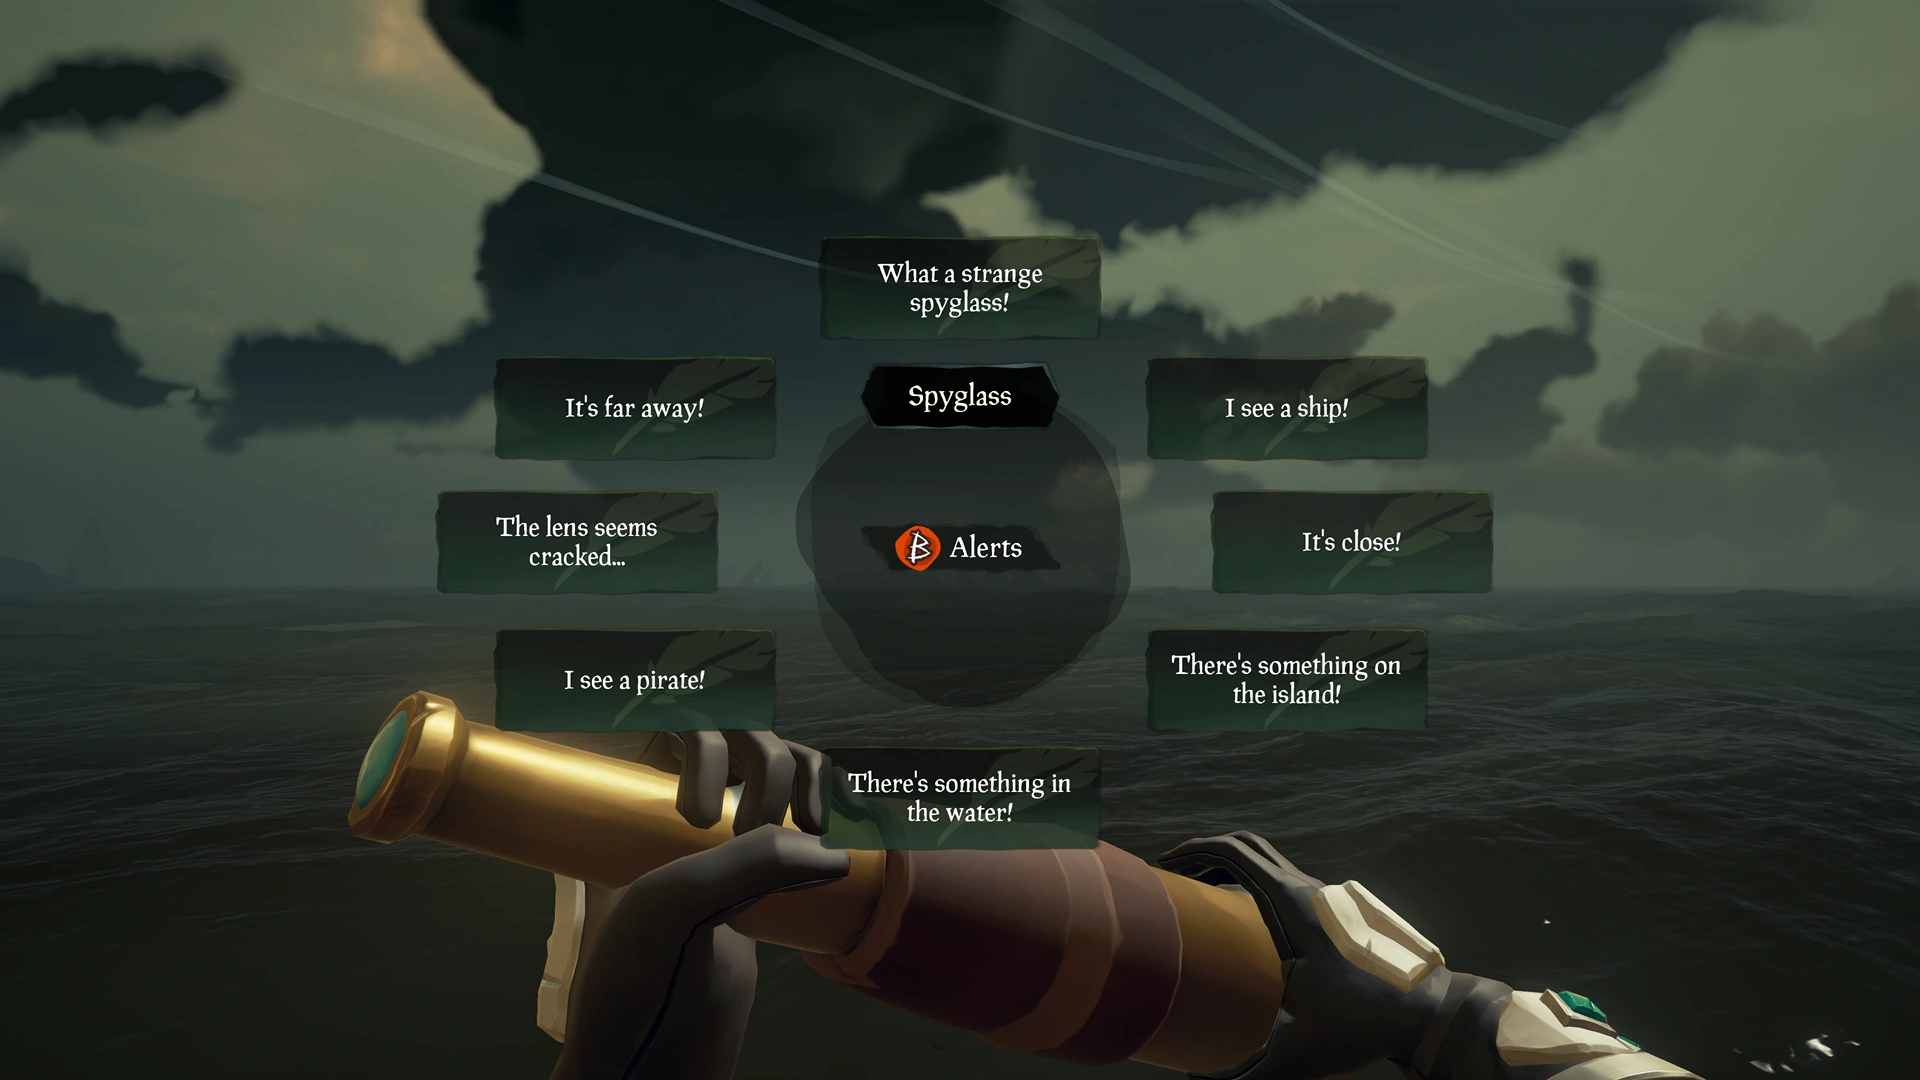
Details: A box small box with the
The box contains the following items:
- Coloured feathers, similar to Lesedi's hat
- Sea Dog medallion, similar to one worn by Lesedi
- Blue and gold fabric, similar to Lesedi's belt
- Red and gold fabric, similar to Lesedi's jacket
- Bottle
Beside the box are two silver coins. One coin has an arrow pointing south by south-east, while the other has an arrow pointing north by north-west.
Gallery:
The box and silver coins at The Glorious Sea Dog.[27]
![The box and silver coins at The Glorious Sea Dog.[27]](https://static.wikia.nocookie.net/seaofthieves_gamepedia/images/f/f2/Mystery_01_0831_The_Glorious_Sea_Dog_Box.jpg/revision/latest?cb=20220831211043)
Details: Images of map pieces are being found through various means, primarily by select newsletter subscibers receiving clues in emails from Sea of Thieves titled "Work together, find the clues.".
- Pieces match together depending on their associated colour to form maps of specific islands within the Sea of Thieves.
- Images, Hidden codes and compass directions have been found on the maps.
- There is a possible link with the codes and the Sea Dogs Cipher Disc to find their secret meaning.
| Island map | Hidden codes | Code meaning | Compass | Imagery | |
|---|---|---|---|---|---|
| Smugglers Bay (Green) |
|
|
North by north-west |
| |
| Old Faithful Isle (Red) |
South-east |
| |||
| Wanderers Refuge (Purple) |
|
|
North-east |
| |
| Ashen Reaches (Yellow) |
|
|
North by north-west |
| |
| Kraken's Fall (Blue) |
|
|
East by south-east |
| |
Gallery:
(For image sources, see section below gallery.)
Smugglers' Bay (Green)
Green piece 1
Green piece 2
Green piece 3
Green piece 4
Green piece 5


Old Faithful Isle (Red)
Red piece 1
Red piece 2
Red piece 3
Red piece 4
Red piece 5


Wanderers Refuge (Purple)
Purple piece 1
Purple piece 2
Purple piece 3
Purple piece 4
Purple piece 5


Ashen Reaches (Yellow)
Yellow piece 1
Yellow piece 2
Yellow piece 3
Yellow piece 4
Yellow piece 5


Kraken's Fall (Blue)
Blue piece 1
Blue piece 2
Blue piece 3
Blue piece 4
Blue piece 5


- Green - Smugglers' Bay
- Green piece 1 - Email
- Green piece 2 - Email
- Red - Old Faithful Isle
- Red piece 1 - Email
- Red piece 2 - Email
- Red piece 3 - Posted by sukitheshipwright on Instagram, an account used previously in the Mystery.
- Purple - Wanderers Refuge
- Purple piece 1 - Email
- Purple piece 2 - Posted by @WinstonPhoebus on Twitter, an account used previously in the Mystery.
- Purple piece 3 -
- Yellow - Ashen Reaches
- Yellow piece 1 - Posted by Lampwick Larry#5958 in #mystery-hunt on the Sea of Thieves Discord, an account used previously in the Mystery.
- Yellow piece 2 - Posted on Sea of Thieves' Offical Xbox Club.
- Yellow piece 3 - Email
- Blue - Kraken's Fall
- Blue piece 1 - Hidden by a chest to the left at 3:01 in The Big Twist video by Sea of Thieves.
- Blue piece 2 - Email
- Blue piece 3 - Posted as a story on the Sea of Thieves' Official Instagram.
- Blue piece 4 - Email
Details: Hidden symbols have being found on the five islands from the map pieces.
- The symbols are found by playing Ballad of the Mer at an activation spot on each island.
- Activation spots are found using Lesedi's Spyglass at the landmarks hinted at on the map pieces in the directions hinted at on the same maps. This will provide and approximate location of the symbol's activation spot.
The symbols match the set of five symbols seen on the mural in Shrine of the Coral Tomb.
- When a symbol is revealed at an island location, the matching symbol on the mural will begin to glow and stay lit (for that specific game server).
Once all symbols are activated, players must travel to the mural at Shrine of the Coral Tomb.
See Mural at the Shrine of the Coral Tomb for further steps.
| Island | Symbol | Location |
|---|---|---|
| Smugglers' Bay | Spiral shell | Use Lesedi's Spyglass at the northern clifftop plank. Looking north by north-west, align the skull's eye with the rock. X marks where to play Ballad of the Mer. |
| Old Faithful Isle | Siren Queen | Use Lesedi's Spyglass atop the highest point by a shattered skeleton. Looking south-east, align the skull's eye with a lookout tower (just below a dead tree). X marks where to play Ballad of the Mer. |
| Wanderers Refuge | Fan-shaped shell | Use Lesedi's Spyglass atop the hill near the old building foundation and barrel. Looking north-east, align the skull's eye with the cave. X marks where to play Ballad of the Mer. |
| Ashen Reaches | Siren King | Use Lesedi's Spyglass at the withered tree found to the north. Looking north by north-west, align the skull's eye with a barrel laying near a large rock. X marks where to play Ballad of the Mer. |
| Kraken's Fall | Trident | Use Lesedi's Spyglass at the Beacon. Facing east by south-east, align the skull's eye with the Kraken spine. X marks where to play Ballad of the Mer. |
Gallery:
The mural at Shrine of the Coral Tomb.
Shell at Smugglers' Bay. [28]
Siren Queen at Old Faithful Isle. [29]
Shell at Wanderers Refuge. [30]
Siren King at Ashen Reaches.
Trident at Kraken's Fall. [31]

![Shell at Smugglers' Bay. [28]](https://static.wikia.nocookie.net/seaofthieves_gamepedia/images/0/09/Mystery_01_0915_Smugglers%27_Bay_shell.jpg/revision/latest?cb=20220915163006)
![Siren Queen at Old Faithful Isle. [29]](https://static.wikia.nocookie.net/seaofthieves_gamepedia/images/e/e8/Mystery_01_0915_Old_Faithful_Isle_Siren_Queen.png/revision/latest?cb=20220915154005)
![Shell at Wanderers Refuge. [30]](https://static.wikia.nocookie.net/seaofthieves_gamepedia/images/b/ba/Mystery_01_0915_Wanderers_Refuge_shell.png/revision/latest?cb=20220915154009)

![Trident at Kraken's Fall. [31]](https://static.wikia.nocookie.net/seaofthieves_gamepedia/images/7/70/Mystery_01_0915_Kraken%27s_Fall_trident.png/revision/latest?cb=20220915160716)
Source: Sea of Thieves Twitter & Sea of Thieves YouTube
Details: A video is shared across Sea of Thieves social platforms titled "🔓" (unlocked emoji). The video shows pirates approaching the mural at the Shrine of the Coral Tomb. The mural's artwork is glowing and an audible "click" of a lock mechanism can be heard followed by the sound of flowing water.
Details: Activating all five island symbols will then activate the mural in the Shrine of the Coral Tomb. Players must then go to the Shrine and find the mural. As they approach the mural, a familiar voice will be heard and a hidden room behind the mural will be opened. Once players enter the room it will begin to fill with water requiring a puzzle to be solved to stop the flow of water.
Note: If all players in the room die, the puzzle is reset and all five symbols must be reactivated.
| Island | Symbol | Location |
|---|---|---|
| Smugglers' Bay | Spiral shell | Use Lesedi's Spyglass at the northern clifftop plank. Looking north by north-west, align the skull's eye with the rock. X marks where to play Ballad of the Mer. |
| Old Faithful Isle | Siren Queen | Use Lesedi's Spyglass atop the highest point by a shattered skeleton. Looking south-east, align the skull's eye with a lookout tower (just below a dead tree). X marks where to play Ballad of the Mer. |
| Wanderers Refuge | Fan-shaped shell | Use Lesedi's Spyglass atop the hill near the old building foundation and barrel. Looking north-east, align the skull's eye with the cave. X marks where to play Ballad of the Mer. |
| Ashen Reaches | Siren King | Use Lesedi's Spyglass at the withered tree found to the north. Looking north by north-west, align the skull's eye with a barrel laying near a large rock. X marks where to play Ballad of the Mer. |
| Kraken's Fall | Trident | Use Lesedi's Spyglass at the Beacon. Facing east by south-east, align the skull's eye with the Kraken spine. X marks where to play Ballad of the Mer. |
- The levers must be activated in the correct sequence to properly complete the puzzle.
The order is as follows:
- Blue
- Pink
- Orange
- Yellow
Completing the puzzles and hearing out the dialogue will unlock the following commendation:
| Commendations | |||
|---|---|---|---|
| Image | Commendation | Requirements | Rewards |
 | The Fallen Sea Dog | You uncovered the truth and learned the tragic fate of the Sea Dog, DeMarco. | +10 |
Details: After completing puzzles to unlock the door in the Shrine of the Coral Tomb, players can hear the Siren Queen speaking of how she has been deceiving pirates about the death of DeMarco, and that she has captured his sister, Lesedi.
After the water level rises, players must pull levers in the correct order. Finally, after turning off a music box, players will meet face to face with the Siren Queen.
The Siren Queen explains how she has been deceiving pirates into believing the Pirate Lord killed his own son, DeMarco. Using his powers, the Pirate Lord appears and crushes the Siren Queen under a rock fall, as Lesedi is freed from a Cursed Mermaid Statue.
In a conversation with Lesedi, the Pirate Lord explains how he previously came here to seek peace with the Sirens, and how he asked DeMarco to be his envoy in connecting with the Sirens. He goes on to explain how DeMarco thought he was a fool for trying to make peace with the Sirens. Their disagreement ended in DeMarco planning to start a new life outside the Sea of Thieves. When the Pirate Lord let this slip, the Siren Queen took the opportunity to frame the him for the murder of his own son. She used her powerful magic to create deceptions, in the hopes of weakening the Pirate Lord's reputation and following.
The scene ends with Lesedi speaking of how she believes her brother's soul may still be out there somewhere, and will continue searching until she can be sure.
Finale dialogue
Siren Queen
So... Another land-dweller sees through my illusion and wishes to avenge the death of the Sea Dog. No matter! I have entombed his sister, and soon I shall do the same to you.
Soon, all shall come to believe that their noble Pirate Lord is the ruthless killer of his own son. He shall be cast out, and the world above shall descend into chaos! Pirates will no longer pose a threat to my dominion...
Pirate Lord
ENOUGH!
You killed my son. Took my daughter. And why? All because you wished pirates to witness the wrath of the merciless Pirate Lord.
Your Majesty - your wish is my command!
Siren Queen is crushed in a rockfall as Lesedi is freed from a Cursed Mermaid Statue.
Siren Queen
NOOOOOOOO!
Lesedi
Dad...? You're here... How did you know?
Pirate Lord
The Sea of Thieves faces so many dangers... That is why I came here once before. To seek peace with the Sirens.
I asked DeMarco to be my envoy, a bridge between the two worlds, but he refused. Chose to depart, rather than watch his father make such a foolish mistake.
When I let slip that DeMarco was leaving, the Siren Queen saw her chance to discredit me. The logbook, the mutiny... Even if I had spoken out, few would have believed me.
Lesedi
The Queen is gone now. People will come to their senses. They'll understand.
Pirate Lord
Perhaps, but that won't bring DeMarco back to us. For that, I have only myself to blame.
Lesedi
We mustn't lose hope! DeMarco's soul may still be out there somewhere. I won't rest until I know for sure.
Pirate Lord
That's my girl... Now, it's time for us to leave. I've got a lot of explaining to do...
Commendations
| Commendations | |||
|---|---|---|---|
| Image | Commendation | Requirements | Rewards |
| The Fallen Sea Dog | You uncovered the truth and learned the tragic fate of the Sea Dog, DeMarco. | +10 |
Other information
It is unclear how — or if — the following pertain to the current mystery.
Source: Sea of Thieves Spotify
Details: In November of 2021, Sea of Thieves released a lofi remix of Becalmed.
- The music video on YouTube features Lesedi, DeMarco's sister, looking over a mysterious map as a music box plays in the background.
- The compass in the upper-right corner of this map does not have an east.
- The lyrics shown on Spotify are different to the lyrics of the regular version of Becalmed.
Becalmed - Lofi Mix Lyrics
Becalmed says ye to sail upon the sea
When we come live on
Our home is here
Fight on for hate
Where the dead have laid
To grieve under the sand they have cried
Where the ocean will sing
Becalmed says they honor has won
Good-bye from home the brave land
I now come sailing through sea
I now come finding home
Fell in love with the ocean's voice
Many men lost tonight
The beast of the deep now sleeps
With the code in my mind I speak
For hope is lost by the moonlight
Blood spills upon the ocean floor
Set to find or venture fate
Now you see empty hands from war
Our ship is no longer on the waves
Details: Paintings found on some Sea Forts, identical to those in The Glorious Sea Dog interior, were removed in patch 2.5.2 and replaced with empty frames.
Source: An Introduction to Mysteries: Official Sea of Thieves
Details: Sea of Thieves shared "An Introduction to Mysteries: Official Sea of Thieves" YouTube video.
- Letters spelling out the word "NEWS" can be seen hidden in the background of the video.
- Two scenes from the video show two different locations where rune tablets used as teasers in the lead-up to A Pirate's Life can be found. These tablets have certain skeleton runes engraved on them.
- Thieves' Haven grave site at 0:45 - death
- Plunder Valley cave at 0:48 - trapped/prisoner
Gallery:
A hidden letter "N" in the video.
A hidden letter "E" in the video.
A hidden letter "W" in the video.
A hidden letter "S" in the video.


Source: Legend Spotlight - SourScar, Sea of Thieves News
Details: The text "##mysterykey-spin##" was found on "Legend Spotlight - SourScar" Sea of Thieves News page. This text was removed from the site at 16:57, 20 minutes after its discovery.
Gallery:
The text on the website.
Details: A scroll previously found attached to a pillar on the third floor of Imperial Crown Fortress was removed and replaced with a single dagger, pinned to the wooden support beam.
Gallery:
The fort before the scroll was removed.
The scroll in the Sea Fort before it was removed.
The fort after the scroll had been replaced by a dagger.


Source: Sea of Thieves Twitter
Details: Sea of Thieves released a "retro rendition" of We Shall Sail Together, mentioning in a tweet "sail like it’s 1989!".
- In 1989 Rare released Who Framed Roger Rabbit, a single-player murder mystery game.
- Attempts had been made by the community to locate a game location similar to the cover artwork, with one possible location being the west beach of Thieves' Haven, however this has not provided any substantial information.
Gallery:
We Shall Sail Together - Retro Mix artwork.

Source: Sea of Thieves Twitter
Details: Across official social channels, Sea of Thieves posted "Snake's nice." along with an image of a piece of snake cooking on a campfire at Devil's Ridge.
- A shape mistakenly thought to resemble the skeleton rune for "song" was believed to be visible on a wooden stick behind the fire. While the pattern is unusual, it does not appear to be a rune.
- Other relevant information within the image has not been found.
Gallery:
The image shared across official social channels.
The unusual pattern on the campfire stick.
The skeleton rune for "song".


Source: Sea of Thieves website
Details: A promotional image used for the Community Hub can be seen on the front page of the Sea of Thieves website with part of a Spotify Code in the bottom left corner of the image. The image, depicting a group of pirates celebrating around the stage in The Glorious Sea Dog interior, has been used elsewhere on the site, but only on the front page is the portion of the code present. The eight bars shown in the symbol are identical to the right-hand side of the Spotify Code linking to the official Sea of Thieves Spotify profile.
- Note: It is uncertain if this is a remnant from a previous promotion.
Gallery:
The image with the partial Spotify Code.
The partial Spotify Code in the image.
The Spotify Code for the Sea of Thieves Spotify profile.
The image used elsewhere on the site without the partial Spotify Code.


Source: Sea of Thieves Twitter
Details: For "#TriviaTuesday", Sea of Thieves shared a stylised, but reused, image across official social channels of DeMarco and Lesedi ready to fight alongside each other. The post is captioned:
Gallery:

Source: Sea of Thieves Twitter
Details: For "#TriviaTuesday", Sea of Thieves shared a reused image of the Gold Hoarder across official social channels. The post is captioned:
Gallery:
The reused image of the Gold Hoarder shared across official social channels.

Source: Sea of Thieves Twitter
Details: Sea of Thieves shared an image of the Gold Hoarder's face, with his hand on his head. The post is captioned:
- A Sloop's Ship Crest with the name "Gold Hauler" can be seen in his right eye.
- On the previous day, Sea of Thieves tweeted "What would the Gold Hoarder name his ship?".
- A pirate wearing Black Dog Jacket, Black Dog Gloves, and wielding the Ferryman Cutlass can be seen in his left eye.
Gallery:
The image shared across official social channels.

Details: With the release of Season Seven, the text on Sea Dog's Rest reading "Who killed DeMarco" as well as the ghostly notes on islands, previously revealed by holding the Fallen Sea Dog Lantern, are no longer visible. It was unknown if this was intentional, or a bug. Later that month, on August 31, 2022 Lesedi's message announced the lantern clues were false creations by an unknown character. All clues found via lantern were removed and the Fallen Sea Dog Lantern lost its special effect and became usable only as a normal lantern.
Source: Sea of Thieves Twitter
Details: Sea of Thieves posted an image of a Pocket Watch with hands pointed at time 05:00 or 17:00, with date as the 5th.
The caption accompanying the post reads:
- Note: The tweet's ALT text incorrectly states that "the hands both pointing to twelve", although this does not match with the clock face in the image.
It is unknown if this post is related, although a possible date was previously given in the Truth Reveals Truths post. When put together, this would make August 22 at five o'clock.
Gallery:
The image shared across official social channels.

Videos
Trivia
- Details summarized in the second official summary video, "Who Killed DeMarco: The Big Twist", misrepresented the clues used to determine the required outfit for the meeting with Burnin' Tony. The video also mistakenly suggests that multiple music boxes were shattered at the time of Lesedi's message while in fact only the music box at The Sunken Grove was broken.
External links
- Mysteries Unfold in Sea of Thieves!, Sea of Thieves News
- Who Killed DeMarco? The Mystery So Far, Part 1, Sea of Thieves News
- Chenzo's Sea Dog Cipher Disc, Github
References
- ↑ Image source: Toasty Flynn#6647, Sea of Thieves, Discord
- ↑ 2.0 2.1 Image source: @_CleanSpirit_, Twitter
- ↑ Image source: Kaptain Karl#9012, SoT Completionists, Discord
- ↑ 4.0 4.1 Image source: u/Joshicus_Saint_Anger, r/Seaofthieves, Reddit
- ↑ Image source: GrayUr#2500, Sea of Thieves RU, Discord
- ↑ Image source: @mateovision01, Twitter
- ↑ 7.0 7.1 Image source: Quinithas#6073, Sea of Thieves, Discord
- ↑ Image source: 𝓐𝓷𝓭𝓻𝓮𝔀#1883, Sea of Thieves, Discord
- ↑ Image source: LegacyCatalyst8#6900, Sea of Thieves, Discord
- ↑ Image source: u/cinemafreak1, r/Seaofthieves, Reddit
- ↑ Image source: Sadden#4541, Sea of Thieves, Discord
- ↑ Image source: ⮫ Ĺ ί ň ķ ⮪#1939, Sea of Thieves RU, Discord
- ↑ Image source: u/Burkut_khan, r/Seaofthieves, Reddit
- ↑ Image source: u/WobbliestJet, r/Seaofthieves, Reddit
- ↑ Image source: JRN#1475, Sea of Thieves, Discord
- ↑ Image source: @WyvernKh, Twitter
- ↑ Image source: Facebook
- ↑ Image source: Eninlow, Twitch
- ↑ Image source: Zoltess#1418, Merfolk's Lullaby, Discord
- ↑ Image source: u/callmelink, r/Seaofthieves, Reddit
- ↑ Image source: War Golem#8961, Sea of Thieves France | SoTFR, Discord
- ↑ Image source: Jericho#9932, Sea of Thieves, Discord
- ↑ Image source: @Earthbound_1, Twitter
- ↑ Image source: u/MatWTM, r/Seaofthieves, Reddit
- ↑ Image source: @JamJags, Twitter
- ↑ 26.0 26.1 Image source: Rami#0991, Sea of Thieves, Discord
- ↑ Image source: @MarySP278, Twitter
- ↑ Image source: Dodovian#1408, Sea of Thieves Official Discord
- ↑ Image source: Lorenz#8583, Sea of Thieves Official Discord
- ↑ Image source: Arno Capostagno#6347, Sea of Thieves Official Discord
- ↑ Image source: Empress Jessica#9987, Sea of Thieves Official Discord